Page 1 of 1
Mounting and sealing the oil pan
Posted: Tue Sep 07, 2021 3:29 am
by rainer
Hello.
I am close to finishing the clutch replacement and I will mount the oil pan coming weekend.
Only to be sure doing nothing wrong...
I see that my oil pan is
slightly deformed around some bolt holes. The bolts must have been tightened too strong in the past.
My plan is to use a hammer and a solid piece of thick flat iron to flatten the flange again. Then I will use sealing paste (silicone) + paper seal to seal the pan to the engine properly.
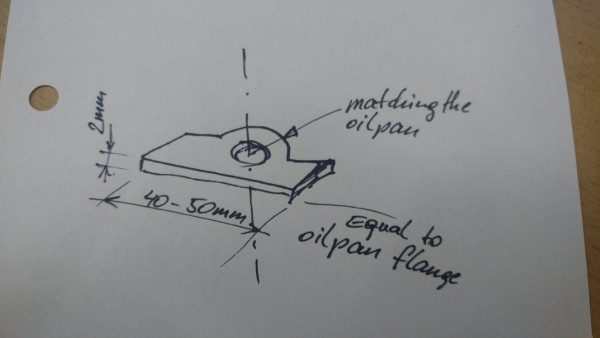
To prevent another deformation of this relatively soft iron I think about laser-cutting special washers of 2 mm sheet metal to be placed between bolt heads and oil pan flange. This will spread the pressure over a wider area and be almost invisible when painted black, too. I made a little sketch below. The "ears" will prevent rotation of the washer and spread the pressure. A thickness of 2 mm should allow using the same bolts.

- My idea for laser-cut washers for oil pan
I also saw that there are external brackets available, to be mounted in the edge from engine to hogshead. Purpose is to stiffen this section of oil pan, if I understand right. I also tend to add such ones.
Is this in general a good idea, or not? How are this oil pan bolts&nuts usually secured against becoming loose? Cotter-pins? Safety wire? Not at all?
Re: Mounting and sealing the oil pan
Posted: Tue Sep 07, 2021 5:05 am
by Professor Fate
Consider using an oil pan jig to ensure proper fit to prevent leaks.
Re: Mounting and sealing the oil pan
Posted: Tue Sep 07, 2021 10:23 am
by TXGOAT2
A bare engine block could serve as a partial jig, if needed. Straightening the pan around the bolt holes and adding the special washers is a good idea, in my opinion. The corner braces are also a good idea. Keep in mind that the T oil pan is a stressed member in that it carries the engine mounts and also locates the radius rod ball, so it is under considerable mechanical stress from engine torque and vibration as well as forces generated when the front or rear wheels encounter a bump or hole in the road. The oil pan has to anchor the front and rear axle assemblies as well as the engine. If a Model T was an animal, the frame might be thought of as the back bone and the oil pan might be thought of as the pelvis.
Re: Mounting and sealing the oil pan
Posted: Tue Sep 07, 2021 11:13 am
by Norman Kling
The probable cause of the deformity is the use of cork gaskets. The cork is soft and can be pressed in. A good paper gasket with some black gook will seal just fine. When you tighten, be sure to start in the center and work out toward the ends. Ends of the block and the hogs head are especially prone to cracking. So tighten snug, then go back and starting at the center and working toward the ends tighten some more. If your engine has the cotter pins use them to keep the nuts from backing off. If a later engine some have lock washers.
Norm
Re: Mounting and sealing the oil pan
Posted: Wed Sep 08, 2021 2:34 am
by rainer
Thank you for all the explanations. You confirmed what I thought.
So I will draw the special washers and corner braces and let them laser-cut at a close company. This way I get all this parts in short time this way.
Hope that bolts are long enough to allow this additional 2 mm below oil pan. Nuts seem to be locking nuts. (They look like crown nuts.) But the engine is a 1916 one when looking for the serial number. So this bolts&nuts have been replaced some time ago.
The gasket already was a paper gasket with additional liquid gasket (= red oil resistant silicone) on both sides. I had to use a sharp scraper to get it off from oil pan and engine block. The silicone was almost completely squeezed out, so heavily the bolts were tightened. But the pull-ups are very small, so I can hit them flat again.
One thing makes it a little bit difficult:
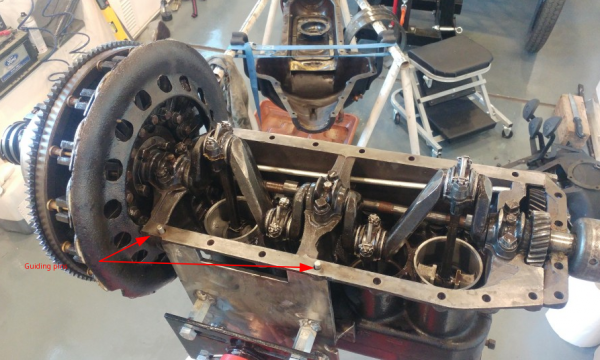
My engine adapter has two pins going through oil pan holes. So I cannot insert this bolts as long as the engine is mounted to the engine stand. So all I can do is tightening all other bolts and add this two bolts later.

- Guiding pins of engine adapter
Indeed, it is very surprising that Henry Ford got this crazy idea to use the oil pan as part of the chassis. A simple bolted-on cross bar below the engine (below cyl 4) as mounting point for the radius rod ball and also the rear stabilizers would have simplified things a lot. But it is as is, it is a Historic Car and I love it.

Re: Mounting and sealing the oil pan
Posted: Wed Sep 08, 2021 5:09 am
by Kerry
As an engine builder I see 2 issues with your engine, 1, the pistons have no oil holes drilled for the wrist pins and 2, that wire rapped around the rod and wrist pin clamp bolt won't stay there for long, use a spring washer or Henry's way of a cotter pin.
Re: Mounting and sealing the oil pan
Posted: Wed Sep 08, 2021 7:30 am
by Joe Bell
I like to start with the front two bolts around the crank and the rear two around the fourth main this helps with alignment to keep the fourth aligned after all the bolts are in.
Re: Mounting and sealing the oil pan
Posted: Thu Sep 09, 2021 11:31 pm
by Nv Bob
Lots RTV sealant blue or black
What I have on hand
Did two band jobs latec3 dip sealed up just fine but my car early Pam dips right behind the ears can't get in there to straighten it up so I remove the hogshead and add more goop once I get new hogs head rebiult
Re: Mounting and sealing the oil pan
Posted: Thu Sep 23, 2021 10:22 am
by rainer
Thank you very much for all your helpful hints.
Here are the latest pictures of my work:
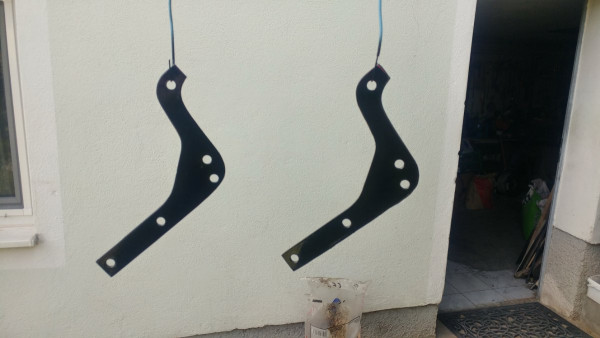
This are my self made reinforcement brackets. They are made of 4mm sheet metal, plasma cut, and painted after grinding and drilling. They have also an extended corner to make them even stiffer.

- Self made reinforcement brackets
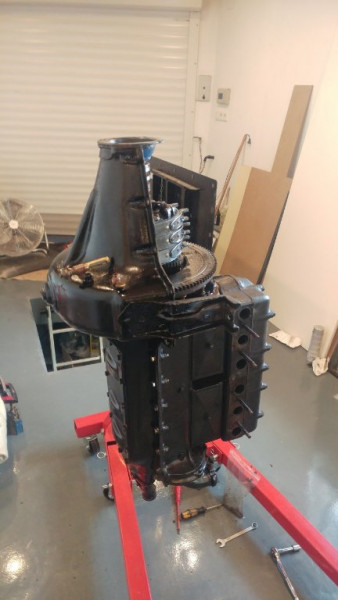
This is the engine with mounted oil pan. I added washers (20mm outer diameter) below bolt heads to protect the oil pan from being pulled up around bolt holes.

- The mounted oil pan.
Both (brackets and washers) led into replacing all bolts by longer ones, but I think this was a good decision.
Enjoy the pictures!
Rainer
Re: Mounting and sealing the oil pan
Posted: Thu Sep 23, 2021 11:53 am
by TXGOAT2
A new, heavy duty, welded pan with accurate critical dimensions would be a nice thing to have.
Re: Mounting and sealing the oil pan
Posted: Mon Oct 04, 2021 5:34 am
by rainer
My oil pan is absolutely straight, the former "specialist" only over-tightened the bolts a bit. So this caused slight pull-ups around some bolt holes.
So there is absolutely no need for a replacement, everything is fine.
I flattened this pull-ups and mounted the oil pan now a bit smarter - I used 20mm washers between bolt head and oil pan. This spreads the pressure and prevents any further pull-ups.