Page 1 of 1
Ground location
Posted: Wed Mar 09, 2022 9:14 pm
by ecory0
So I repainted my headlights and tail light and now they don’t work. Reading through the forums it is apparent I painted over the location where the light grounds. What I’m still unsure of is where exactly do I need to sand and remove paint to make the ground connections. I’m a visual learner If someone could post a picture of the location. The descriptions in the older posts weren’t clear to me. Thank you!
Re: Ground location
Posted: Wed Mar 09, 2022 9:40 pm
by TRDxB2
All depends on how your wired (year matters)
non-starter - with dimmer
If you headlights are connected in series (magneto bulbs) then one output wire from the light at the end of the run needs to be grounded.
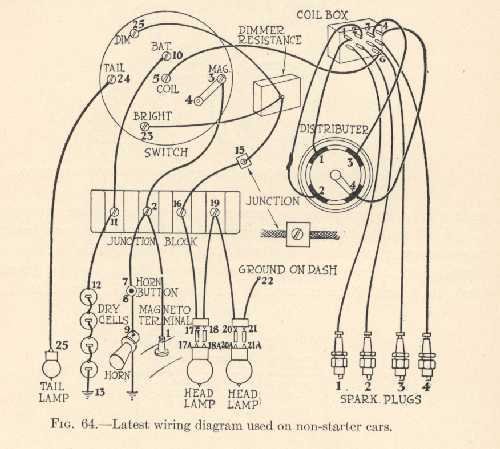
- non-starter disgram.jpg (43.2 KiB) Viewed 3872 times
--
--
All others
The socket is connected to to the headlight bucket via the hole in the bucket and the adjusting screw.
The headlight bucket itself is grounded via being bolted to the base of the fender support bracket.
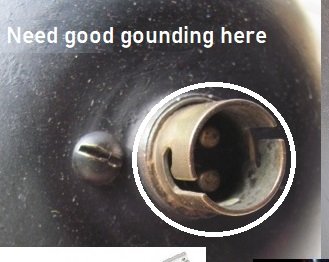
- gron.jpg (21.17 KiB) Viewed 3862 times
So do a continuity test to see if the bucket is grounded - once this is resolve then test if the outside of the socket while everything is connected to the car. next check continuity in the bulb (bottom bump to outside bulb shell
Re: Ground location
Posted: Thu Mar 10, 2022 3:29 am
by Wayne Sheldon
There are a dozen places that you can lose the ground-path. Bulb to socket. Socket to bucket's socket sleeve, or between that socket sleeve and the bucket itself (I have found several of those that have failed over the years!). Ground may or may not reroute through the adjusting screw and spring?
Then between the bucket itself and the mounting post (happens fairly often!).
When painting, almost anything in the ground path might not make contact. Between the mounting post and the fender bracket is one of the most common places to lose ground-path. Between the fender bracket an the frame is another place that ground path is often lost. Sometimes ground might find another route through the fender? Or it may not.
Sometimes, just putting good sharp lock washers between the bolts, nuts, fender brackets and frame can restore reliable ground. One of my cars a few years ago, even a shim and a lock washer on the mounting post to fender bracket would not hold ground reliably. I did enough testing to determine that was the spot the ground was not holding, so I found a modern wheel lug-nut with the tapered end? I replaced the proper castle nut and cotter pin along with the added lock washer that wasn't adequate with the tapered lug-nut biting into the underside of the fender bracket. Just so they would match, I did the other side the same way.
A couple people razzed me about those, I told them I didn't mind, at least both my headlamps were working when driving at night!
It is also common to lose ground path on a number of places near the battery. But those places will likely affect a lot more than one headlamp.
After a few go-arounds with various model Ts and grounding troubles? If I am restoring a nearly hundred year old rusty headlamp? Before I make it pretty, I often put a small spot of braze inside the headlamp bucket between the socket sleeve and the bucket itself. That socket sleeve was not originally welded or otherwise well attached into the bucket! It was a tight fit, with a little crimp to keep it from falling out. The amazing thing is, that most of them have stayed in place at all for nearly a hundred years. I have had several pop out simply because the socket was stuck inside and the sleeve came out easier than the socket was willing to! And I have had two definitely, and a couple other maybe, the ground-path was lost between that sleeve and the bucket itself, in spite of the fact that the sleeve was tight and otherwise in decent condition. That spot of braze once assembled is completely out of sight, harmless, and virtually guarantees that place will not lose ground-path without some other significant damage first!
I also usually put a small spot of braze in the most bottom area, as close to out of sight as I can find, between the post mounting bracket and the bucket itself. This after a couple restored headlamps lost ground-path between those pieces. A two minute fix to prevent a couple hours chasing gremlins later.
I like to drive my Ts at night! And I like my lights to work when I want them.
Re: Ground location
Posted: Thu Mar 10, 2022 6:22 am
by Allan
if everything else is clean and tight, you might consider soldering a wire between the bulb socket and the lamp body. I bare off one of the rivet heads and solder to that. This provides a solid ground between the two components, bypassing any paint/corrosion/loose fit which may lead to a poor ground.
Hope this helps.
Allan from down under.
Re: Ground location
Posted: Thu Mar 10, 2022 7:22 am
by J1MGOLDEN
I repaired one years ago that had so much bondo that I had to run separate ground wires to the head lights and taillight.
You can use an ohm meter and measure between the head light and a bare spot on your frame or engine to determine where the problem is located.
Then between the fender and taillight if you make a very small bare spot.
Re: Ground location
Posted: Thu Mar 10, 2022 10:12 am
by varmint
This suggestion is not about removing paint: I am working on the tail lights, replacing the sockets with dual bayonet connectors. Since we disassembled the frame and painted everything, I am running a separate ground wire to everything. Right now we have no wiring at all. So, not an issue for us. There are ways to add a ground so that it does not show.
Re: Ground location
Posted: Thu Mar 10, 2022 3:22 pm
by Oldav8tor
Dan Treace had an article in the MTFCI Model T Times about grounding a headlight socket internally. He soldered a small islet to a wire, attached it to the socket adusting screw inside the headlight with the other end going to another point inside the headlight. - I added a small machine screw to the bucket with a nut on the inside to connect the other end of the wire. You should also make sure there is a good ground between the socket in the frame and the rod that attaches the headlight to it.
Re: Ground location
Posted: Thu Mar 10, 2022 7:27 pm
by ecory0
Thank you all very much. This will be my weekend project so wish me luck!
Re: Ground location
Posted: Sun Mar 13, 2022 11:36 am
by jiminbartow
It is common to loose the ground after extensive painting that leaves no bare metal. I have seen this occur after the engine has been completely painted, losing the ground between the engine and the chassis where the main ground is attached to the battery.
If the loss of ground is between the painted bucket attachment brackets and the fender, you can achieve a hidden ground by filing the paint smooth down to the steel inside the fender holes and inside the square bucket attachment bracket holes, so the bare threaded shaft of the bolt completes the connection. This is also useful where protective rubber pads are installed between the fender and the bucket attachment brackets, like on the ‘26 and ‘27’s. Jim Patrick
Re: Ground location
Posted: Sun Mar 13, 2022 6:39 pm
by ecory0
Woot woot! Thank you everyone! Got the headlights going. Now on to the tail light. I painted that as well. Where is the ground on that one?
Also, my headlights work but when I switch to dim, nothing.
Re: Ground location
Posted: Sun Mar 13, 2022 8:36 pm
by jiminbartow
Ground from the tail light housing to the fender, to the body, to the chassis where the main ground from the negative battery post attaches. All of the electrical components eventually find their way to the chassis ground. Same concept as with the headlight. You can hide the ground by filing the inside of the holes so the bolts can complete the ground connection. Good luck. Jim Patrick
Re: Ground location
Posted: Sun Mar 13, 2022 9:02 pm
by Allan
To get around the devious route and multiple connections between the light body/bracket/car body/chassis, I run a second wire, soldered to the bulb socket in the tail light and then to the chassis.
Allan from down under.
Re: Ground location
Posted: Sun Mar 13, 2022 10:22 pm
by jiminbartow
I can understand that wires from all of the various components directly to the chassis are a way of achieving a direct ground to the chassis, but wires are really unnecessary if you can achieve the same thing the way Ford designed it, without a spiderweb of wires all over the car. Jim Patrick
Re: Ground location
Posted: Sun Mar 13, 2022 11:13 pm
by Allan
Jim, the internal ground wire in the headlight bucket is never seen. The second wire from the tail light is no different to running two wires to have a tail light and brake light within the tail amp body. It is essential when the tail lights are mounted on a wooden body such as a depot hack.
Allan from down under.
Re: Ground location
Posted: Mon Mar 14, 2022 12:09 am
by jiminbartow
That make sense Allan. I didn’t think of that. Jim Patrick
Re: Ground location
Posted: Mon Mar 14, 2022 7:26 am
by Allan
No worries Jim. I learned by experience when I built my 1917 wooden bodied shooting brake, and used that experience when fitting twin tail lights to my barn find buckboard.
Allan from down under.