Page 1 of 1
HEAD LIGHT REASSEMBLY & REFURB
Posted: Wed Nov 23, 2022 4:15 pm
by MartinJ
I have a 1915 Canadian model T tourer, which I am rebuilding. I am currently working on the Head Lights, which are the fork mounted Canadian style, although I believe the installation of the spring, reflector, glass & rim etc are the same regardless of what type of headlight bucket.
I have been researching how the reflector etc are fitted to the bucket and found numerous earlier articles on the forum about this subject, that always seem to leave out the important bits and no pictures.
My question is : how do I fit the reflector spring (it is a Lang repro 6586X) , followed by the reflector etc. A picture of each procedure would be appreciated as the descriptions found do not help as I have never seen a headlight being assembled, nor a completely assembled unit. My original units were not complete.
Re: HEAD LIGHT REASSEMBLY & REFURB
Posted: Wed Nov 23, 2022 6:20 pm
by TRDxB2
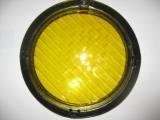
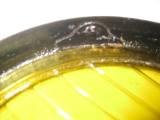
To start with your lens are not put in correctly note the top
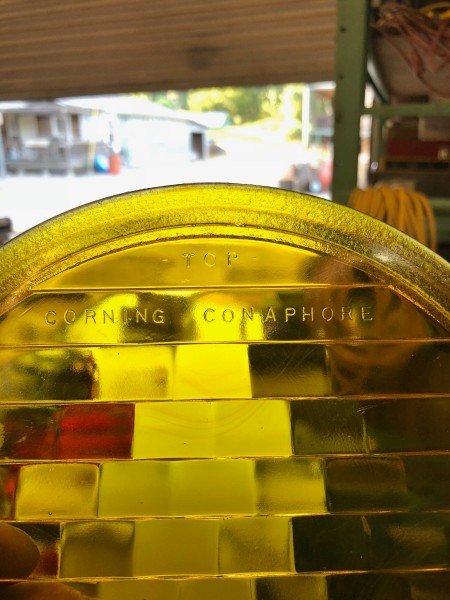
- corning.jpg (57.81 KiB) Viewed 3910 times
--
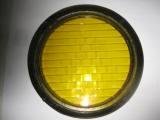
You should be using the one for round glass
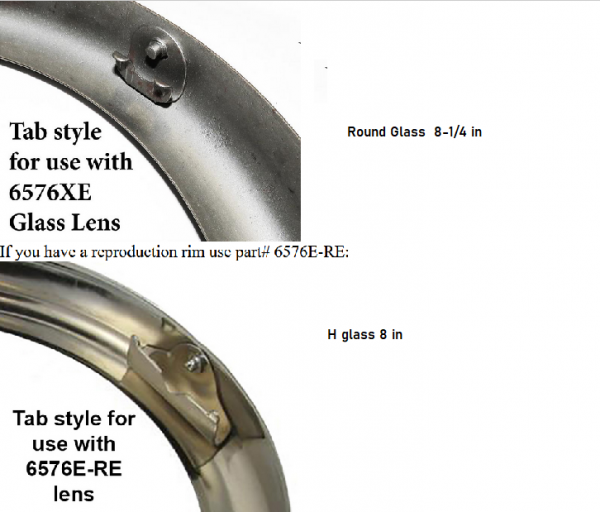
- rim diff.png (269.47 KiB) Viewed 3910 times
--
The spring goes in like this
- spring.png (186 KiB) Viewed 3910 times
our rim
--
The reflector notches need to fit over the indents on the headlight bucket, press in and rotate clockwise ti secure them
--
--
The pins on the rim fit into the indents on the bucket, press in and rotate clockwise
Re: HEAD LIGHT REASSEMBLY & REFURB
Posted: Thu Nov 24, 2022 11:34 am
by Mark Nunn
Ends of the rope are at the bottom. A few dabs of grease will hold it in place while you install the lens.
Re: HEAD LIGHT REASSEMBLY & REFURB
Posted: Thu Nov 24, 2022 12:03 pm
by TRDxB2
As Mark suggests use a dab of grease in a few spots to hold the rope on place gives better squish when compressing the rim than a sealant. Leave a small gap between the rope ends at the bottom to allow condensation to escape. Thinking to that wiping down the rope gasket with a thin coating of silicon grease to act as a water shield may not be a bad idea either.
Original rope gasket was cotton, new repro (nylon?) is much stiffer. 1/8" cotton sash cord is available. Some of these have a polyester core for strength, not needed as a gasket. Ease of compressing the gasket helps in removing the rim.
Note: gasket dimensions
3/32" 2.381mm
1/8 " 3.175mm
Re: HEAD LIGHT REASSEMBLY & REFURB
Posted: Thu Nov 24, 2022 4:08 pm
by MartinJ
Many thanks for the response to date.
The pictures were taken when the T arrived and the headlights had not been touched. Thank you for pointing out they should be installed with the wording at the top.
The refurbed front axle had been temporarily fitted.
Do I assume the Spring once fitted (the off set ends are presenting a challenge, any suggestions to ease clipping together ?), with the loops facing upwards press on the back of the reflector ?
The reflector is a very tight fit in the headlight bucket and has to be eased in. Does it require some bending of the bucket rim to help ?
The headlight rims have the Tabs (re useable) as stated for use with 6576XE Glass Lens in one and in the other rim, very rough Tabs (that need replacing) as stated for use with 6576E-RE Glass lens. Are either of these Tabs available or would I have to fabricate them ?
I have acquired Clear, Round lenses and have assumed I can use them in either Rim ? In place of the Yellow ones on the basis the Yellow ones would emit less light then the Clear ones, although the Yellow ones would be a talking point here in the UK.
The intention is to use two filament LED bulbs in the head lights to give a main & dipped beam. Whilst the T has not got electric starting, I intend to fit a battery to power the lights and to provide some form of basic charging via the magneto, with LED bulbs keeping the current needed to power them to a minimum.
Re: HEAD LIGHT REASSEMBLY & REFURB
Posted: Thu Nov 24, 2022 4:18 pm
by Kerry
Martin, your refurbed front end is not correct for 1915, it should be a tapered leaf spring, the perches should be for a radius rod to be above the axle. The stub axles are later as well.
Re: HEAD LIGHT REASSEMBLY & REFURB
Posted: Thu Nov 24, 2022 4:33 pm
by Allan
Martin, LED bulbs do not have filaments. They have multiple LEDS arranged to put out light in different directions in an effort to throw some light down the road somehow. I know of no bulb which will give a true high and low beam. Rather they will give more or less light, so you will get dim and bright, but do real dipping of the beam for low beam If that is acceptable to you, they will certainly use less battery current than filament type globes. Do you know if LED bulbs are legal for road use in the UK?
Allan from down under.
Re: HEAD LIGHT REASSEMBLY & REFURB
Posted: Thu Nov 24, 2022 5:20 pm
by Luke
Allan wrote: ↑Thu Nov 24, 2022 4:33 pm
... They have multiple LEDS arranged to put out light in different directions in an effort to throw some light down the road somehow. I know of no bulb which will give a true high and low beam. Rather they will give more or less light, so you will get dim and bright....
Allan,
You may have missed some of the later threads on LED's for Model T's? Just to update you - there are a number of LED lamps that fit Model T's and which use single diode emitters. Moreover these are spatially set to permit 'normal' full/dip operation (as are also some of the other lamps that cluster a series of emitters in a small area).
Martin,
When you come to focus your headlamps it's better to do them with the lens removed. I expect you're sorted from the advice given but if you want any further background this thread gives some information:
viewtopic.php?f=2&t=25440
Luke.
Re: HEAD LIGHT REASSEMBLY & REFURB
Posted: Thu Nov 24, 2022 8:44 pm
by J1MGolden
Those are very rare first electric Ford head lights and they are somewhat larger than all the later ones.
I have only seen one other set in 40 years.
Take good care of them!
Re: HEAD LIGHT REASSEMBLY & REFURB
Posted: Thu Nov 24, 2022 10:39 pm
by Kerry
James. No not those ones, just a stock set that came out on the first of Canadian T's part number 6511x 8-1/2" The part No for the stork one was 6511-1/2 8-1/2"
Re: HEAD LIGHT REASSEMBLY & REFURB
Posted: Fri Nov 25, 2022 1:48 am
by TRDxB2
MartinJ post_id=255208 time=1669324080 user_id=3349]
"Do I assume the Spring once fitted (the off set ends are presenting a challenge, any suggestions to ease clipping together ?), with the loops facing upwards press on the back of the reflector ?"
Yes hook and press in with loops up.
--
--
The reflector is a very tight fit in the headlight bucket and has to be eased in. Does it require some bending of the bucket rim to help ?
Do not bend anything. Tight fit = no rattles
--
--
The headlight rims have the Tabs (re useable) as stated for use with 6576XE Glass Lens in one and in the other rim, very rough Tabs (that need replacing) as stated for use with 6576E-RE Glass lens. Are either of these Tabs available or would I have to fabricate them ?
I have not seen 6576XE for sale and only one set of 6576E-RE from Chaffins in the classifieds. BUT the issue is in the rivets that are used. Past discussions have indicated that the length is critical for attaching the rim onto the headlight bucket. I have seen several variations of inside lip for 6576XE. Not sure how much you care about matching - a picture of what you have will help
--
--
I have acquired Clear, Round lenses and have assumed I can use them in either Rim ? In place of the Yellow ones on the basis the Yellow ones would emit less light then the Clear ones, although the Yellow ones would be a talking point here in the UK.
Originally the lens were clear and thicker than window pane glass. A change was made to shade the upper half of the lens because of glare to oncoming drivers - many aftermarket versions followed with various designs to focus the light onto the roadway. Understand the reflect just projects light forward but doesn't aim it. That's why the later H style lens has flutes. Amber lens have always been the choice when driving in fog (does it get foggy in the UK  Warm light enhances shadows while whiter light lightens colors giving the appearance of a brighter light for the same amount of lumens.
--
--
The intention is to use two filament LED bulbs in the head lights to give a main & dipped beam. Whilst the T has not got electric starting, I intend to fit a battery to power the lights and to provide some form of basic charging via the magneto, with LED bulbs keeping the current needed to power them to a minimum.
Careful on the purchase of LED bulbs to give you a main & dipping beam. Some require an external dimmer while others have one internal. Since you are planning to use LED bulbs powered by battery consider the following. A set of LED headlight & taillight bulbs may only draw 3 amps. A small 12volt 100Ah deep charging battery (fishing trolling motor for example) can power those lights for 100Ah/3A = 33hours: 30 continuous hours of use before needing to be recharged. A GPS unit the asks if you want it o stay on when you turn the engine off has its own battery, plugging it into the vehicle port allows it to be charged. Cell phones don't consume much either when being recharged. Using a battery maintainer from time to time is all you need. There is always the risk of overcharging with a magneto charger kit (12v needs a different bulb) or a generator.
Re: HEAD LIGHT REASSEMBLY & REFURB
Posted: Fri Nov 25, 2022 5:32 am
by Luke
TRDxB2 wrote: ↑Fri Nov 25, 2022 1:48 am
Careful on the purchase of LED bulbs to give you a main & dipping beam. Some require an external dimmer while others have one internal...
... 100Ah/3A = 33hours: 30 continuous hours of use before needing to be recharged....
Frank,
I'm interested in these LED lamps that use an external dimmer? All of the LED's I've seen or used myself use standard emitter displacement for (properly) lowering the beam cast on dip and require no external components. I should think that if you had any references for the types you mention it could be useful for Martin as he'd then know what to avoid.
Also, not wanting to be a pedant (but probably coming across as one - sorry!), if one is using using a standard SLA type of battery it shouldn't be discharged by much more than 30% - 40% of its capacity for maximum life (thus using your example current draw above you might say ~11 hours of runtime). If you discharged one to nothing it would result in a markedly reduced lifespan, especially if it was done regularly.
However with a LiFePO4 battery you could use say 80% of its capacity without issue. They also hold a fairly flat voltage across the discharge time whereas the SLA would gradually reduce. As these (LiFePO4) types are becoming much more common it's worth considering them for this sort of purpose now - the one proviso it that they really don't like being completely discharged.
Luke.
Re: HEAD LIGHT REASSEMBLY & REFURB
Posted: Sat Nov 26, 2022 5:00 am
by MartinJ
Gentlemen,
Thank you again for the ongoing responses.
Martin, your refurbed front end is not correct for 1915, it should be a tapered leaf spring, the perches should be for a radius rod to be above the axle. The stub axles are later as well.
Thank you for the comment, but I am aware of this and it is what I have. Unless it cannot be used for some technical reason or is dangerous, then I have no choice but to stick with it.
HEAD LIGHT RIMS
I have attached some pics of the two rims, showing the two types of rim tabs :-
- IMG_9357 - Copy.JPG (7.29 KiB) Viewed 3519 times
- IMG_9356 - Copy.JPG (8.15 KiB) Viewed 3519 times
- IMG_9355 - Copy.JPG (7.35 KiB) Viewed 3519 times
- IMG_9354 - Copy - Copy.JPG (7.97 KiB) Viewed 3519 times
I hope they show the alternative Tabs
Re: HEAD LIGHT REASSEMBLY & REFURB
Posted: Sat Nov 26, 2022 11:24 am
by TRDxB2
The tabs on the rim were intended to hold the different style of glass, round vs H. But if your round lens is secure in H rim then it should be a problem. If not then figure a way to extend the clips
Re: HEAD LIGHT REASSEMBLY & REFURB
Posted: Sun Nov 27, 2022 8:39 am
by MartinJ
Mick,
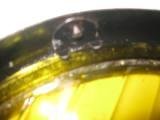
Having studied your pictures of the reflector in the bucket and the note saying 'Indent', and tried the installation, I find the lens sits on the four indents (see attached pics) and cannot be turned to miss the indents you indicate on your post, which in turn means the external button release cannot be pressed as the internal sprung serated clip is clamped. If I ease the reflector past the four indents, to allow the reflector rim to sit below them and below the indents you indicate, then it is still impossible to turn the reflector as it is tight in the bucket.
Any suggestions please
Martin
Re: HEAD LIGHT REASSEMBLY & REFURB
Posted: Wed Nov 30, 2022 12:06 pm
by TRDxB2
I don't have any 1915 headlight buckets to reference so I am relying on past discussions for information and pictures. There were several versions of the buckets and also aftermarket ones. Having said that, the components are pretty much the same. The picture you included showing the edge of the reflector, red box, looks different than the reference photo. Also not sure what the release button in the yellow box attached to inside the bucket looks like, may be its preventing the rim from going down. And the edge of the So full pictures showing the inside of the buckets & rims will help understand what you have.
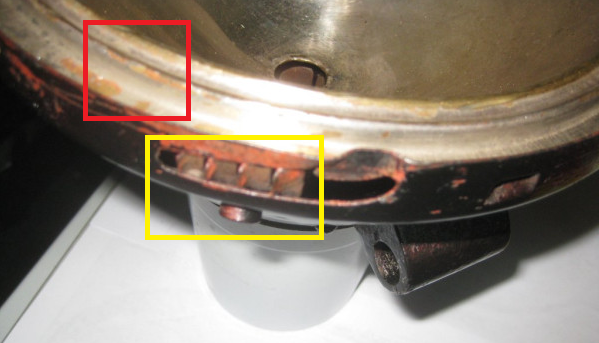
- ealy bucket.png (270.21 KiB) Viewed 3300 times
--
--
THIS is the reference photo. Notice the notches on the reflectors rim
--
--
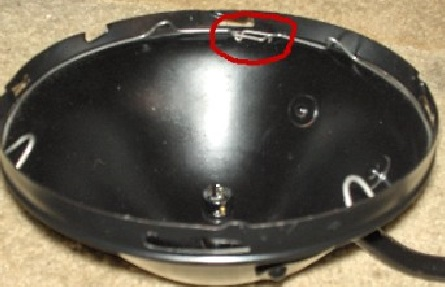
This is what I am referring to as the indent
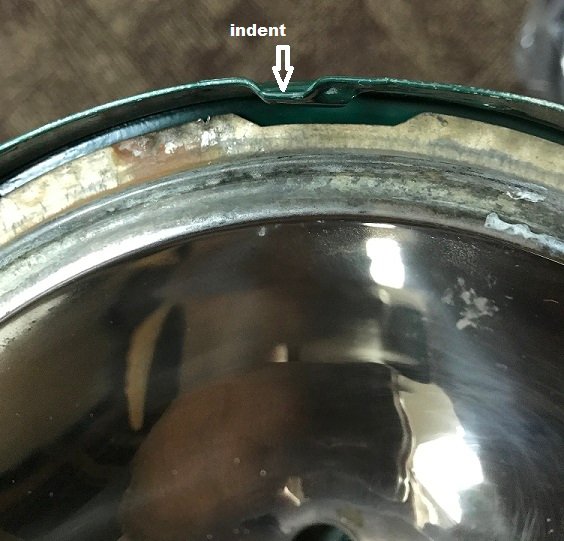
- indent.jpg (65.28 KiB) Viewed 3300 times
--
--
Wondering if you have a Model A single bulb reflector
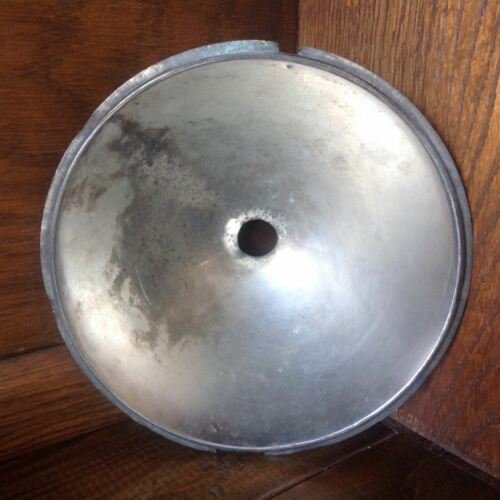
- MODEL A single bulb.jpg (36.58 KiB) Viewed 3294 times
Re: HEAD LIGHT REASSEMBLY & REFURB
Posted: Wed Nov 30, 2022 2:32 pm
by MartinJ
Frank
Interesting comment and thank you for the additional pictures.
I attach pictures of my headlight bucket, and reflectror.
I have a Model A and the reflector is not the same as a Model A one.
Hope the attached pics help and you may be able confirm what I need to do to get the headlights assembled
Martin
Re: HEAD LIGHT REASSEMBLY & REFURB
Posted: Wed Nov 30, 2022 3:03 pm
by TRDxB2
Think its best to work with one headlight & reflector at a time. Are you having any trouble assembling a headlight with the Model T reflector or it just the non Model T(modified) reflector? I can't tell if the "modified" one has a groove for the gasket but it does look different and the hole for bulb socket looks enlarged. Check the outside diameter of the two as well. The "modified" reflector could be stock but for a different vehicle
If its the reflector then the solution is to get a Model T one like the one you have. I have some.
--
--
Also are you aligning the reflector notch with the indent in all 4 positions?

- indent.jpg (65.28 KiB) Viewed 3256 times
Re: HEAD LIGHT REASSEMBLY & REFURB
Posted: Wed Nov 30, 2022 3:09 pm
by Scott_Conger
Martin
take a close look at Frank's picture of an "indent". You will notice that the entire perimeter of the bucket's rim is the same diameter with the exception of the 'pooched-in' section that clears the pin(s) on the rim. By design, there is a slanted slot that the pin follows along while being twisted, slowly drawing it in until it "clicks" into place. Very often that long poorly supported bit of metal is bent inward from crashing into the rim's pin. This will keep the reflector from seating. If you look around the vast majority of your bucket, your reflector appears to want to just drop in and the only interference is along the four areas where the bucket is bent in from lack of support. If this is the case, just use your thumbs to bring the ENTIRE perimiter of the bucket to the same diameter and you will find that the reflector will drop in.
Finally, I would give significant thought to replacing those reflectors with new, "best quality" reflectors. They are outstanding reflectors and for the price are an outstanding value. The only thing I found is that for my 1915 with standard buckets was the fact that they were about 1/32" too large in diameter and a quick trip past my belt sander took care of that, with no damage to the reflector itself.
Re: HEAD LIGHT REASSEMBLY & REFURB
Posted: Wed Nov 30, 2022 4:08 pm
by MartinJ
Both reflectors have the gasket groove and both can be eased into either bucket,
but cannot be turned , which in turn prevents them passing the second set of indents as indicated on one of my noted pics.
One Reflector is marginally greater diameter then the other (220mm dia & 221mm dia)
I have attached some pics of the Reflectors. There is a pic of the two reflectors , one sitting inside the other and the second pic
the reversed, (second reflector sitting inside the first). Also a side by side pic of the reflectors
I had originally thought I would replate the reflectors once I had resolved the fitting, but,
now think I will replace them with new ones.
Therefore to recap, if I have reflectors that will go in passed the indents that allow the Rim to be twisted on,
do they sit on the second set of indents or once twisted, sit below ?
Do all headlight buckets have button release mechanisums and if so,
then once the reflector is twisted into place
will it allow the button release to be operated ?
Re: HEAD LIGHT REASSEMBLY & REFURB
Posted: Wed Nov 30, 2022 4:24 pm
by TRDxB2
Not all the fork style buckets appear to have release buttons, at least it looks that way. Also you may try what Scott suggested to do with new reflectors and that is to trim down the outside edges of the ones you have. Also make sure your buckets are round as well