Page 1 of 1
27 Roadster top installation
Posted: Sat Aug 30, 2025 7:43 am
by Eric Sole
I have read a lot of posts about top installations, but I am unclear on these points which are appearing as I start the installation of my Classtique top. I purchased this kit 10 years ago and did not unpack it for a couple of years. I have been advised that it will have creases in it for life, but that is a chance I will take.
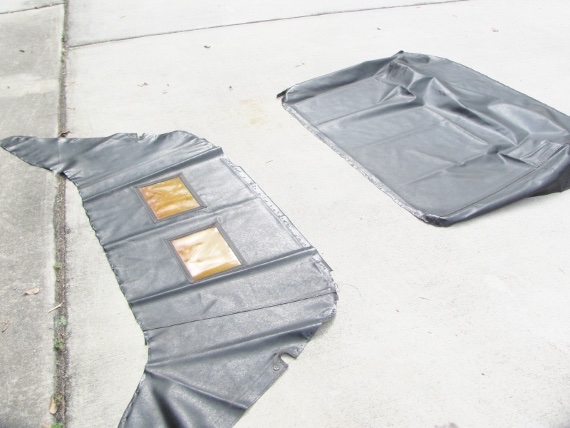
WIND-BREAKER
My old top had a wind-breaker that spanned completely across the front bow.
The new wind-breaker does not span across the front bow.
Old and new wind-breakers together:
Asking for experience here: Is the shorter style wind-breaker enough, or do I need to have sections sewn on to span across the bow to prevent air coming over the side curtains when they are installed?
REAR BOW ANGLE/HEIGHT
I have read that the rear bow should be plumbed even with the tack rail on the body, making the rear curtain perfectly vertical.
I have also read where the rear bow should be angled further back, which would make the rear curtain lean slightly rearward.
I welcome comments from those with experience in this area.
Re: 27 Roadster top installation
Posted: Sat Aug 30, 2025 8:42 am
by Humblej
You have the windbreaker on wrong. It should be on the bottom side of the front bow and wrap around the front and back of the bow. The flap with the snaps should hang down in front of the windshield to block the wind between the windshield and top. Snaps are for the side curtains to fasten to.
The rear bow should not be plumb with the body.
My advice would be to stop and get some good instruction befor proceeding.
Re: 27 Roadster top installation
Posted: Sat Aug 30, 2025 8:52 am
by CudaMan
The windbreaker on my 1924 top is like the shorter one that you have in your "new" kit. It has a snap on each end that the side curtain snaps onto to help seal that corner.
I chose to angle my rear bow such that a plumb bob hung from the rear bow fell one inch behind the body sill. I'm happy with it, but two inches might have been even better, IMO.

Re: 27 Roadster top installation
Posted: Sat Aug 30, 2025 9:31 am
by TMiller6
I recently installed a top on my ‘26 Runabout. I started with Cartouche and finished with Classtique.
The windbreak you show straddles the top of the windshield frame and the Vee is supposed to line up with the windshield wiper hole in the metal frame. There is no snap on the outside corners; your side curtains install on the back side of the stanchions and never touch the windbreak as they did in 1925 and earlier.
I made the mistake of buying a Cartouche top for my car years ago and not installing it. The issue was not creases, the front corners were made wrong and I could not get it to fit. When I called Cartouche, they told me tough luck; it was my fault for not installing it upon receipt. One side of the material was so short it would not reach the front bow. The material on the other side was gathered into a box corner and it also didn’t fit the front bow.
Ultimately Mike from Classtique saved me by providing me with a new correct fitting top deck.
As for the angle of the back bow, I also used a plumb line. Then I adjusted the angle slightly so the edges of the triangular side panels were parallel with the rear bow arms. Plastic clamps came in handy here.
I hope you have better luck with your Cartouche top than I did.
Re: 27 Roadster top installation
Posted: Sun Aug 31, 2025 9:46 am
by Eric Sole
Just for the record, my top kit was made by Classtique, not Cartouche.
Thanks for your input. So it sounds like matching the angle of the side irons to the cut of the top's side panels is the way to go. This puts my rear bow 1 1/4" rear of the body tack strip.
Re: 27 Roadster top installation
Posted: Sun Aug 31, 2025 11:04 am
by KWTownsend
The rear curtain should follow the trajectory of the back of the seat back outer panel.
Re: 27 Roadster top installation
Posted: Sun Aug 31, 2025 12:48 pm
by TXGOAT2
The backward rake of the top should match that of the rear body panel and it should be the same or very close to that of the windshield.
Re: 27 Roadster top installation
Posted: Sun Aug 31, 2025 4:30 pm
by Eric Sole
Aha! Now those are real visual clues. Thanks!
Re: 27 Roadster top installation
Posted: Sun Aug 31, 2025 5:33 pm
by TMiller6
Eric,
Sorry I mixed up the manufacturer. The rest of my advice is still sound.
Re: 27 Roadster top installation
Posted: Sun Aug 31, 2025 6:06 pm
by Allan
The long grain in the material of the "original " windbreaker you show is not original as used by Ford, so having it fitted is a later error.
The front corners are a little more difficult to make tidy. More than once I have seen the material drawn down firmly and tacked to the bow, which makes the bottom hemmed edge low. Then the top material was cut backwards for 3-4" so the bottom edge can be lifted back into line, and tacked into place. The cut and the tacks are then hidden by the binding. Tom's corner looks like the cut step has not been done, so there is a tuck to get the bottom line in place.
Hope this helps,
Allan from down under.
Re: 27 Roadster top installation
Posted: Sun Aug 31, 2025 6:19 pm
by TMiller6
Allan, without removing the welt, I will assure you I did do the horizontal cut back per the instructions. I too looked at the photo and feel it’s the angle making it look that way.
Re: 27 Roadster top installation
Posted: Sun Aug 31, 2025 6:38 pm
by TMiller6
I will also add that my Son dawdled this year and missed the cut for the OCF. He and his missus will be babysitting this car, this year at the Old Car Fest. Inspections of my upholstery and questionable paint will be tolerated.
It’s fitting that he sit with it since he’s the one who dragged this car into my shop twelve years ago. I plan to write an article about this albatross and hope the Club will publish it.
Apologies to Eric for hijacking his thread.
Re: 27 Roadster top installation
Posted: Mon Sep 01, 2025 9:01 pm
by DanTreace
Couple of pics from an install by Eliz,when she owned Classtique.
Wrap the front bow with vinyl first, the other bows get wrapped with cotton bow drill.
Then fit the windbreak to the front bow, note the slot for the wiper arm.
The place top cover over the top pads after the rear curtain and gypsy are fastened to the rear bow and rear tub tack strip. The rear bow angle is usually set by the top irons when fully extended, but have a bit of overhang, for rain run off and to keep the brim of your hat from hitting the rear curtain

- 611017 copy.jpeg (56.14 KiB) Viewed 3993 times
Re: 27 Roadster top installation
Posted: Mon Sep 01, 2025 9:17 pm
by speedytinc
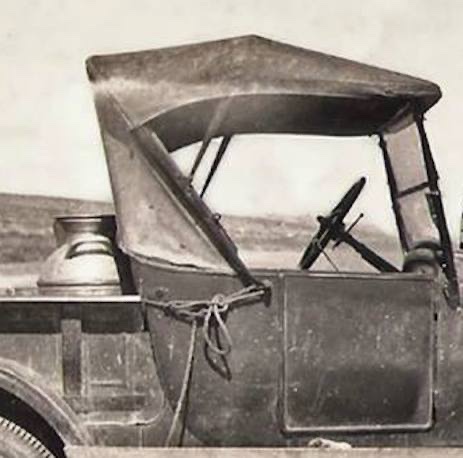
Good period picture showing the rear closely following the rear body tub angle.
Re: 27 Roadster top installation
Posted: Tue Sep 02, 2025 4:19 pm
by Eric Sole
I'm starting to get the gist of this.
I'm the first to admit I know little about doing tops and interiors. It's not a part of the car that I enjoy working on, but I don't have the cash to go to an upholstery shop, so this is what I will need to do to finish this car.
Many thanks guys. Dan, that last pic really shows the angle of the top
Re: 27 Roadster top installation
Posted: Mon Sep 08, 2025 12:22 am
by Ken Buhler
Look at my post of Oct 25 2021 titled "Improved Open Car Surgery and Build". You will see that the forward edge of the front bow is vertical with the hinge pins (which sets the WS post angle) and the rear bow edge is centered over the upper deck panel.
Ken Buhler
Re: 27 Roadster top installation
Posted: Mon Sep 08, 2025 1:19 pm
by Eric Sole
Thanks Ken. I see your front bow side arms look to be perfectly horizontal. When I set the side arms to horizontal, the rear bow is leaning back 1.5" past the tack rail on the body.
Re: 27 Roadster top installation
Posted: Mon Sep 08, 2025 1:24 pm
by Eric Sole
Were these squared hide-em welt caps used on the late roadsters?
They would look right in place at the front end of the welt where the top is tacked onto the body.
Re: 27 Roadster top installation
Posted: Mon Sep 08, 2025 1:36 pm
by Jerry VanOoteghem
Eric Sole wrote: ↑Mon Sep 08, 2025 1:19 pm
Thanks Ken. I see your front bow side arms look to be perfectly horizontal. When I set the side arms to horizontal, the rear bow is leaning back 1.5" past the tack rail on the body.
Move the rear bow to where you believe it should be. How far from horizontal is the front bow, once that's done? Chances are, the rear bow can move a lot with only minimal impact on the front bow angle. In the long run, a poorly placed rear bow will stick out like a sore thumb, while the angle of the front bow will be barely noticed.
Re: 27 Roadster top installation
Posted: Mon Sep 08, 2025 4:42 pm
by Eric Sole
That's sound advice Jerry. It's true that the front bow side arms move very little compared to the rear bow.
I'm looking at pictures of the old top, and it does appear to almost match the windshield rake. I really hadn't ever noticed it, not until a new top had to be fitted.
Re: 27 Roadster top installation
Posted: Mon Sep 08, 2025 6:34 pm
by Allan
The bow to the windscreen is fixed, The socket does that, in conjunction with the stand-off brackets that fix it to the windscreen stanchions. The length of the rear bow is fixed by the socket too, as is the mounting for the front two bows. There really is no room for adjustment.
Allan from down under.
Re: 27 Roadster top installation
Posted: Mon Sep 08, 2025 7:49 pm
by Jerry VanOoteghem
Allan wrote: ↑Mon Sep 08, 2025 6:34 pm
The bow to the windscreen is fixed, The socket does that, in conjunction with the stand-off brackets that fix it to the windscreen stanchions. The length of the rear bow is fixed by the socket too, as is the mounting for the front two bows. There really is no room for adjustment.
Allan from down under.
The angle of the rear bow has room for adjustment.
Re: 27 Roadster top installation
Posted: Tue Sep 09, 2025 1:46 am
by Allan
It will be a minor adjustment, if any, but that may be all that is needed. If you can lay the back bow back a bit, it will take the mounting point for the second bow back too, and that will be impeded by the fixed front bow. All you have to make adjustments, is the flexing within the assemblies, not any new positions.
Allan from down under.
Re: 27 Roadster top installation
Posted: Tue Sep 09, 2025 12:52 pm
by Eric Sole
Eric Sole wrote: ↑Mon Sep 08, 2025 1:24 pm
Were these squared hide-em welt caps used on the late roadsters?
They would look right in place at the front end of the welt where the top is tacked onto the body.
welt cap.jpg
Does anybody have the square hide-em welt caps (picture appears previously on this post) on their 26-27 open car?
I have looked at dozens of pictures and cannot see this end cap. Most of the photos are not high enough resolution.
Re: 27 Roadster top installation
Posted: Tue Sep 09, 2025 5:18 pm
by Norman Kling
Unless you have installed one yourself, do not criticize. They are hard to get just right, and each company who makes them does it a bit different. Almost all cars on the road today are using after market tops. The type material used is not even quite the same, but when measured correctly and wrinkles are taken out, they can look very good. Your installation looks much better than mine!
Re: 27 Roadster top installation
Posted: Tue Sep 09, 2025 6:40 pm
by Jerry VanOoteghem
Eric,
The best advice I can give about installing a top is...
1. Use tacks and not staples. Pound in the tacks only 1/2 to 3/4 of the way.
2. Don't think you'll simply install it and be done. Adjustments will be needed constantly, as you progress. That's the reason for not pounding in tacks completely until you're done, and for not using staples, which are a b**tch to remove when adjustments are needed.
3. Take your time. Stand back every so often and look at the overall "picture" to be sure the desired shape is still "there" and that there are no wrinkles.
I'm sure you'll do a great job!
Re: 27 Roadster top installation
Posted: Tue Sep 09, 2025 6:53 pm
by Allan
Norm, if it was me you perceive as being critical, I offer an apology. I was expressing the fact that with a 26-7 top there is little room for "adjustment" unlike the earlier cars. All hinge/mounting points in the roadster top are at fixed points. The length of the bows in the sockets is fixed by the curve in the irons. The only adjustment that can be made is in the width of the timbers between the top.
You cannot "adjust" any one of the bows without affecting the others. This does not mean you cannot finesse the fit to get thing laying in the best position, but there are limits as to how far you can go. Play/wear at any pivot point will allow some juggling, but it will be limited.
Allan from down under.
Re: 27 Roadster top installation
Posted: Wed Sep 10, 2025 1:00 am
by ewdysar
Eric Sole wrote: ↑Tue Sep 09, 2025 12:52 pm
Eric Sole wrote: ↑Mon Sep 08, 2025 1:24 pm
Were these squared hide-em welt caps used on the late roadsters?
They would look right in place at the front end of the welt where the top is tacked onto the body.
welt cap.jpg
Does anybody have the square hide-em welt caps (picture appears previously on this post) on their 26-27 open car?
I have looked at dozens of pictures and cannot see this end cap. Most of the photos are not high enough resolution.
My ‘27 Runabout’s top was re-placed about 30-40 years ago. It has the pointed welt caps in a nickel finish.
Keep crankin’,
Eric
Re: 27 Roadster top installation
Posted: Wed Sep 10, 2025 1:19 am
by Eric Sole
Jerry, very sage advice indeed. Your first point, "Use tacks and not staples," is probably the single biggest help to working with upholstery projects. We can see how staples are abundantly applied in the installation videos, but that is being done by people with ample experience who have a 99% chance of getting it right the first time. I used staples for the seat installation, and while they are (relatively) easy to install, they are difficult to remove, making it easy to gouge the material. On the other hand, a partially installed tack is dead easy to remove. My new mantra is going to be "tacks from the start, not staples".

I have a feeling that is going to make working with textiles much easier, and in particular, the installation of a top that requires many adjustments.
Sincere appreciation from my side for everyone's posts. They are all taken into consideration and are helping to get one more Model T out on the road in tip-top (no pun intended) shape.
Re: 27 Roadster top installation
Posted: Wed Sep 10, 2025 2:10 am
by Eric Sole
Eric, my old top was installed 60 years ago and also had nickle plated pointed welt ends installed with a nail.
I'm wondering what the factory was installing on the last two years of production.
Re: 27 Roadster top installation
Posted: Wed Sep 10, 2025 6:24 am
by Jerry VanOoteghem
Eric Sole wrote: ↑Wed Sep 10, 2025 1:19 am
Jerry, very sage advice indeed. Your first point, "Use tacks and not staples," is probably the single biggest help to working with upholstery projects. We can see how staples are abundantly applied in the installation videos, but that is being done by people with ample experience who have a 99% chance of getting it right the first time. I used staples for the seat installation, and while they are (relatively) easy to install, they are difficult to remove, making it easy to gouge the material. On the other hand, a partially installed tack is dead easy to remove. My new mantra is going to be "tacks from the start, not staples".
I have a feeling that is going to make working with textiles much easier, and in particular, the installation of a top that requires many adjustments.
Sincere appreciation from my side for everyone's posts. They are all taken into consideration and are helping to get one more Model T out on the road in tip-top (no pun intended) shape.
Eric,
I really appreciate your feedback.
Re: 27 Roadster top installation
Posted: Wed Sep 10, 2025 11:08 am
by KMcoldcars
I did upholstery on collector card for about 35 years. Staples can be used and easily removed if they are not driven in all the way and a staple puller tool is used to remove them.
Re: 27 Roadster top installation
Posted: Wed Sep 10, 2025 8:56 pm
by Allan
The trick is to adjust the stapler load so it does not drive the staples all the way in. Easy to pull, and easy to tap home if not pulled. Us marine stainless staples when doing tops.
Allan from down under.
Re: 27 Roadster top installation
Posted: Fri Nov 14, 2025 8:11 am
by Eric Sole
My old top, installed some 60 years ago, had 2-inch-wide black woven belting to set the distance between the bows. It appears to be cotton with a reinforced core.
My car did not have any belting from the rear bow down to the body tack strip, but I am told it should have.
The "Encyclopedia" states the following:
Just out of curiosity, does anyone have an original top to confirm the width and thickness of the factory woven belting?
Re: 27 Roadster top installation
Posted: Fri Nov 14, 2025 3:17 pm
by DanTreace
Eric
Those pair of rear straps from the back bow to the tub wood trim strip are wider than 2", and are made of several pieces of fabric with sewn edges. Reason is a lot of stress on those, as the top is erected, and when folded. (1926 pictured)
On my '23 cut-down pickup, worked to fabricate a used '24 top covering, and related pieces, to make a top. You can see the wide rear straps from the seat trim wood to the rear bow. Plain webbing is used for the top straps that run to the front bow. The bow pads cover the curved portion of the bows to give body to the top, and prevent the 'starved horse' look of a top that doesn't have enough support.

- IMG_9297 (600x450) (600x450).jpg (138.53 KiB) Viewed 2119 times
Re: 27 Roadster top installation
Posted: Fri Nov 14, 2025 3:24 pm
by DanTreace
Pieces of used '24 top covering, the body and the rear curtain used to mount on the '23.
- IMG_9295 (570x428).jpg (105.75 KiB) Viewed 2115 times
Finished top job. 
Re: 27 Roadster top installation
Posted: Sun Nov 16, 2025 3:35 pm
by Eric Sole
Dan, that's a really nifty re-use of an old top. It sure fits in with the car's patina. Nice match!
Re: 27 Roadster top installation
Posted: Sun Nov 16, 2025 3:39 pm
by Eric Sole
And thanks for the info on the rear vertical straps. I got the top kit with the roll-up rear curtain, so it will certainly need the additional reinforcement of the wider straps.