Page 1 of 1
New Classtique Top for my ‘24 Touring
Posted: Mon Mar 16, 2026 12:29 pm
by mbowen
I finally opened the new Classtique top kit for my ‘24 you touring, two months after delivery. The canvas top that came to me on the car, while fitting quite nicely, has seen better days. The the rear side panels are tattered, and the third bow is broken, so I’m a bit embarrassed to even put it up.
I’ve watched YouTube videos (several times each) from Classtique and onewhocollects, and I think I can do a reasonable job of installing it myself, but am open to any advice or suggestions along the way. The first tour of the season is over two months out (CanAm Tour, Elora, Ontario), so I’m hoping that’ll be more than enough time to get it done.
First question: Is there any value in the old canvas top as a pattern? If so I’ll try to take care in its removal and someone can have it for shipping costs.
 Viewed 577 times")
- Second question: Is the angle of the rear curtain correct, or does the rear bow need to be a bit further aft.
 Viewed 577 times")
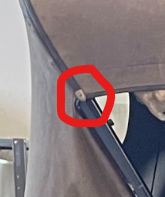
- Notice the broken bow over the front seat
 Viewed 577 times")
- Yes, I know the oval window isn’t “correct” but the new one will be.
Re: New Classtique Top for my ‘24 Touring
Posted: Mon Mar 16, 2026 12:35 pm
by speedytinc
The rear bow needs to be several inches back. There is a dimension (2 -3")? (in the instruction sheet?) Also good to look @ factory Fotos.
(That's how I determined the correct overhang for a 27 roadster. That & help from forum posts.)
Re: New Classtique Top for my ‘24 Touring
Posted: Mon Mar 16, 2026 2:15 pm
by Jerry VanOoteghem
The best advice I can give is to be open to making adjustments, (sometimes a lot of them), as you go. Don't fasten anything down "for keeps" until you've managed to stretch out all the wrinkles and creases. Work on flat, level ground, (which I assume you would anyway). Fitting a top while the body has a slight twist or skew to it will result in a creased top when the car returns to flat ground. Mark the centers of your bows and your top. Align the top panels to those center marks and begin attaching working from the center outward.
Also, us engineering types like to measure everything very carefully, getting both sides the "same", etc. Model T tops aren't things of precision. Get it the best you can, then stand back and view the car from all angles until you've got what looks right. Small differences will blend into the overall picture.
And yes, as stated above, the back panel should have a back leaning rake to it.
First question: Is there any value in the old canvas top as a pattern?
Probably not but look carefully how the current top is cut and fit at the front corners. This is where even the best fit tops can fall short. It's a tricky cut & fit and it looks like your existing top was done well there.
Notice also on your old top, how the rear panel and the top panel meet nicely on the rear bow, (at the dart end of your welting). Adjusting the top panel fore & aft, while also adjusting the rear panel up & down, will help achieve that nice "meet-up".
- top.png (55.77 KiB) Viewed 517 times
Should we be concerned??
- Hmmm.png (102.8 KiB) Viewed 517 times
Re: New Classtique Top for my ‘24 Touring
Posted: Mon Mar 16, 2026 3:53 pm
by mbowen
speedytinc wrote: ↑Mon Mar 16, 2026 12:35 pm
The rear bow needs to be several inches back. There is a dimension (2 -3")? (in the instruction sheet?) Also good to look @ factory Fotos.
(That's how I determined the correct overhang for a 27 roadster. That & help from forum posts.)
Thanks John. The Classtique instructions say the rear bow should be “straight up from the body”. I think that will look about right, but I’ll look for factory photos too.
Jerry VanOoteghem wrote: ↑Mon Mar 16, 2026 2:15 pm
The best advice I can give is to be open to making adjustments, (sometimes a lot of them), as you go. Don't fasten anything down "for keeps" until you've managed to stretch out all the wrinkles and creases.
I’ve read to only drive the tacks about half way until you have the panel where you want it; that way they are easier to remove for adjustment.
Jerry VanOoteghem wrote: ↑Mon Mar 16, 2026 2:15 pm
Work on flat, level ground, (which I assume you would anyway). Fitting a top while the body has a slight twist or skew to it will result in a creased top when the car returns to flat ground.
I plan on doing the work pretty much where it sits now, just a little further back and to the right for clearance from the airplane and shelving. I’m confident that the hangar floor is at least as flat and level as most places the car will ever be. (I probably should make sure the tires all have the same pressure…

) [/quote]
Jerry VanOoteghem wrote: ↑Mon Mar 16, 2026 2:15 pm
…look carefully how the current top is cut and fit at the front corners. This is where even the best fit tops can fall short. It's a tricky cut & fit and it looks like your existing top was done well there.
The
Classtique video shows an interesting technique of doing the front corners starting about 33:22.
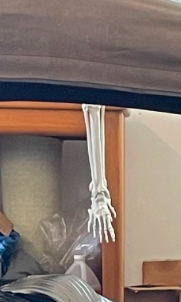
That’s my “original owner” who likes to ride around with me around October/November. He sleeps on top of a shelving unit the rest of the year.
Re: New Classtique Top for my ‘24 Touring
Posted: Mon Mar 16, 2026 6:54 pm
by KWTownsend
Miles,
The rear curtain should follow the same trajectory as the outside of the back seat back panel.
: ^ )
Keith
Re: New Classtique Top for my ‘24 Touring
Posted: Mon Mar 16, 2026 7:46 pm
by rickd
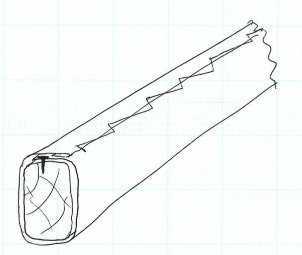
Miles, finished the top on my 25 Touring last year using a Classtique kit. I restored the framework, installed new bows, wrapped them and put it on the car. Had an upholstery friend do the pads and top for me. I downloaded dozens of photos of 25 tops from every angle I could find on the internet and put them on a thumb drive. We used those pics to figure out how things should look on a 25 top as we worked on it. That really helped because neither of us had done a top on a Model T before. It also helped to see how the welting should lay, and how the little spear trim pieces should look. Attached a pic of bow measurements that also helped a lot to get us started.
Re: New Classtique Top for my ‘24 Touring
Posted: Mon Mar 16, 2026 9:35 pm
by mbowen
KWTownsend wrote: ↑Mon Mar 16, 2026 6:54 pm
Miles,
The rear curtain should follow the same trajectory as the outside of the back seat back panel.
: ^ )
Keith
I’ve read that before, but I’m not sure how to do that with a a curved back seat panel.
Re: New Classtique Top for my ‘24 Touring
Posted: Mon Mar 16, 2026 9:45 pm
by mbowen
Rick, thanks for the sketch with the top frame measurements, I hadn’t seen that before. The Classtique video said their rear bow was 23” above the tack rail, which is close to the 22-1/2 on your sketch. As best as I could measure with the top still on, mine is about 25”, which would explain why it’s so far forward.
Re: New Classtique Top for my ‘24 Touring
Posted: Mon Mar 16, 2026 10:37 pm
by 1925 Touring
I know sometimes there's people on the forum looking for used top material, or seat material.
I'd save the material, offer it on the forum, someone probably would like a used top for a car that isn't 100% restored. If it's not all full of issues, I'm sure someone could put it to use.
Re: New Classtique Top for my ‘24 Touring
Posted: Tue Mar 17, 2026 2:41 pm
by PorkChops
mbowen wrote: ↑Mon Mar 16, 2026 12:29 pm
I finally opened the new Classtique top kit for my ‘24 you touring, two months after delivery. <snip>
Would asking you for a photo-story of the whole process fill you with dread? It's always interesting to see some of the history of a car unfold with something like this.
Re: New Classtique Top for my ‘24 Touring
Posted: Tue Mar 17, 2026 5:39 pm
by Original Smith
While you are at it replace that bow! Keep your eyes open for correct hidem tips too! They are hard to find.
Re: New Classtique Top for my ‘24 Touring
Posted: Tue Mar 17, 2026 10:26 pm
by mbowen
Original Smith wrote: ↑Tue Mar 17, 2026 5:39 pm
While you are at it replace that bow! Keep your eyes open for correct hidem tips too! They are hard to find.
I’m definitely going to replace that bow. The only thing holding it up was the wrap. There’s a 3rd generation family-owned millworks 15 minutes from me and I plan go there tomorrow and pick up a piece of clear white ash.
I wouldn’t know a “correct” hidem tip if it bit me, but I’ve saved the ones that were on the car, and the Classtique kit came with new ones as well.
Re: New Classtique Top for my ‘24 Touring
Posted: Wed Mar 18, 2026 1:22 am
by mbowen
PorkChops wrote: ↑Tue Mar 17, 2026 2:41 pm
mbowen wrote: ↑Mon Mar 16, 2026 12:29 pm
I finally opened the new Classtique top kit for my ‘24 you touring, two months after delivery. <snip>
Would asking you for a photo-story of the whole process fill you with dread? It's always interesting to see some of the history of a car unfold with something like this.
No problem PorkChops; that is my plan, starting now. I’ve never done a top before, or any upholstery for that matter, so if anyone sees me going astray please speak up.
I started today (Tuesday) by replacing the windshield stanchions with a nicer set than those that came with the car. The old ones looked nice enough, but when I wire wheeled them in preparation for repaint I found that they were badly pitted and had been repaired with body filler. I found a nearly pristine set in the classifieds here a few months ago, and got them cleaned up and painted last week.
I then started to pull staples.

I ground a staple puller out of an old 3/16” diameter scratch awl, which I had in turn ground out of an old screwdriver many years ago. I got all of the staples out except those attaching the rear panel, and only had to touch up the tip once. For ease of access I removed the majority of the staples with the top folded down, raising each finished bow for access to the next.
 Viewed 161 times")
- Sharp hollow ground angled tip on my homemade staple puller made getting behind the staple relatively easy. Quenching the tip in water immediately after grinding made it hard enough for reasonable durability.
Upon getting the main top panel loose from the front three bows, I noticed there were no straps between the second bow and the header, none between the rear and second bow, and no straps inside the pad covers, as called for in the Classtique kit and all videos I’ve seen on the subject. The only fore/aft structure was the pad covers, and the only structure between the rear and second bows was the rear panel itself. The top always stayed neat and tight (except for the broken bow), so I’m guessing that whoever installed this top was good at upholstery, but wasn’t very familiar with Model T’s.
 Viewed 161 times")
- Look ma, no straps! This is the configuration I took the measurements from.
Before removing the pad covers I raised the top and reattached the header bow to the windshield so I could take measurements to compare with Rick Duquette’s sketch. The rear bow is a full 4 inches higher and nearly 5 inches further forward than it should be, and the 3rd bow is 4 inches higher than it should be. Fixing these discrepancies should improve the look, and maybe lower the top enough to go in my enclosed trailer with the top up.
 Viewed 161 times")
- My actual measurements are circled.
This last photo is where I ended up tonight. After removing the rear panel I’m going to remove the bow assembly from the car so I can clean and repaint it, replace the 3rd bow, and wrap the bows.
 Viewed 161 times")
- On the 3rd bow (highest in the picture) you can see the broken end of the wood.
Re: New Classtique Top for my ‘24 Touring
Posted: Wed Mar 18, 2026 6:13 am
by Eric Sole
speedytinc wrote: ↑Mon Mar 16, 2026 12:35 pm
The rear bow needs to be several inches back. There is a dimension (2 -3")? (in the instruction sheet?) Also good to look @ factory Fotos.
(That's how I determined the correct overhang for a 27 roadster. That & help from forum posts.)
I recently installed a Classtique top kit on my 27 Roadster. Before starting, I gathered dozens of pictures and videos from the forum and the internet, which helped me get the top spot on. This process took more time than the actual top installation, but it's invaluable if you don't have another car nearby as a reference.
Regarding the angle of the rear curtain, the instructions indicate "push the rear bow up so it is plumb, straight up from the body", but contemporary pictures will show that the factory-installed top is angled back. I set mine a couple of degrees less than the angle of the windshield, which equates to 3 inches rearward of the body.
Some of the images are of 26-27 models. I don't know if the angle is identical for the 1924 model, but it must be pretty close.
Re: New Classtique Top for my ‘24 Touring
Posted: Wed Mar 18, 2026 6:20 am
by Eric Sole
It's amazing how many details are forgotten in the minutes after viewing the videos. You'll need to watch them many times before you start and then during the installation. I took screenshots of the more challenging points and printed them to have the reference right on hand. Invaluable.
Re: New Classtique Top for my ‘24 Touring
Posted: Wed Mar 18, 2026 6:54 am
by rickd
Another resource I used for top installation- Installing A Replacement Top On Your Model T, Royce Peterson, Model T Ford Fix-January 4, 2018.
They are working on a 15 Touring but some good info for all T top replacements. One of the better tips was using big store flexible trim material to position the bows prior to attaching the straps. I used some long plastic edging and stapled it to the bows to hold them in position while attaching the straps.
Re: New Classtique Top for my ‘24 Touring
Posted: Wed Mar 18, 2026 9:24 am
by Jerry VanOoteghem
Miles,
For what it's worth, this is how I attach bow drill.
First, tack down the material arranging your tacks towards the rear edge of the bow, not down the center.
Stretch the bow drill over the bow, overlapping the row of tacks, (to hide them).
Roll over the end of the bow drill and tuck it under, to make a nice, neat, hemmed edge, running along the bow centerline.
Hand stitch the edge of the bow drill in a zig-zig pattern, making 1" long stitches. (It may help to temporarily tack down this edge to hold things in place while you stitch.) When pulled taught, the zig-zag stitch will draw up the bow drill to make a tight, snug fit around the bow. The idea is to cover the tacks, which may work loose eventually and wear a hole in the top.
Here is my poor sketch...
- bow.png (69.11 KiB) Viewed 81 times
The ends of the bow drill should extend over the end of the bow socket, maybe by an inch, but ideally, should not extend below the edge of the top material. Leave extra length to be able to roll under the end of the bow drill, to make a nice straight edge where the material terminates. Maybe save this detail for later, when the top is installed and you know where the edge of the top will be.
Also, consider buying one of these...
https://www.amazon.com/Chrome-Canvas-St ... =8-15&th=1 It makes stretching the top MUCH easier, especially if you end up with not much edge to grip on.
Re: New Classtique Top for my ‘24 Touring
Posted: Wed Mar 18, 2026 12:25 pm
by mbowen
Eric Sole wrote: ↑Wed Mar 18, 2026 6:20 am
It's amazing how many details are forgotten in the minutes after viewing the videos. You'll need to watch them many times before you start and then during the installation. I took screenshots of the more challenging points and printed them to have the reference right on hand. Invaluable.
True. I just finished watching Classtique‘s video for about the 6th time and I still caught things that hadn’t sunk in before.