Page 1 of 1
'26 Touring refurb...
Posted: Sun Jan 06, 2019 10:39 pm
by Barth_Tool_Co
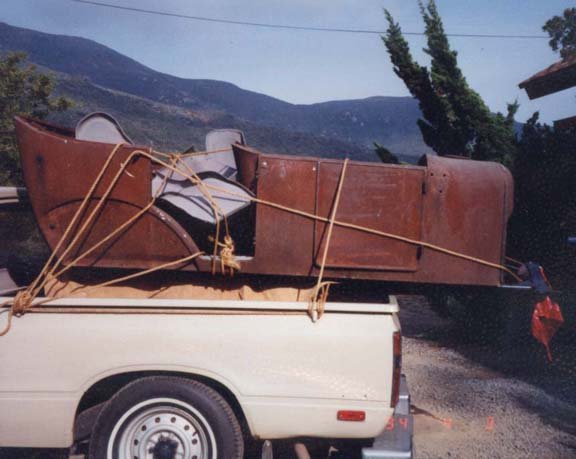
What better way to start a new year and joining the new forum than posting a thread on the refurbishing of my 1926 touring.
I picked up the car a few months ago with the intention of going through it over winter for some summer touring... The FORD itself is in OK condition and was cosmetically restored eons ago, mechanically it's been limping along on borrowed time for a few decades now... lots of worn parts in need of attention.
Lets kick this off with a few pictures of the FORD right before work began...
Re: '26 Touring refurb...
Posted: Sun Jan 06, 2019 10:57 pm
by RustyFords
Nice car Jason....looking forward to seeing your progress.
Re: '26 Touring refurb...
Posted: Sun Jan 06, 2019 11:05 pm
by Steve Jelf
Looks like a good one.
Now that we have automatic resizing, you can post your picture files full size so they nearly fill the screen.
Re: '26 Touring refurb...
Posted: Mon Jan 07, 2019 3:17 am
by Tony_H
Nice lookin' car.
Re: '26 Touring refurb...
Posted: Mon Jan 07, 2019 1:58 pm
by Barth_Tool_Co
I'm waiting on a new steering shaft and some other things from Lang's so I'm not getting tons done but I have been picking away at stuff. I took the steering column apart as it was slop city. The throttle and spark rods were work as was the quadrant... I welded the rods and reshaped them but the quadrant was so bad I found a NOS one for a replacement. I also found this cool walnut wheel but the spider was too thick for the T column so I'm making a Ford part work. Plan is to make it a Fatman wheel.
Re: '26 Touring refurb...
Posted: Mon Jan 07, 2019 2:04 pm
by Barth_Tool_Co
The Ford came with this Trico mirror attached to the window frame but it didn't look right, the bracket wasn't curved to match the window frame... Maybe it's for a closed car. I had one that was curved to match so I swapped it. It's larger than the Trico anyway so it's a win win.
Re: '26 Touring refurb...
Posted: Mon Jan 07, 2019 2:11 pm
by Barth_Tool_Co
rustyfords wrote: ↑Sun Jan 06, 2019 10:57 pm
Nice car Jason....looking forward to seeing your progress.
Your progress also.... I've been watching you work on the 2018 forum!
Re: '26 Touring refurb...
Posted: Mon Jan 07, 2019 2:59 pm
by RustyFords
Barth_Tool_Co wrote: ↑Mon Jan 07, 2019 2:11 pm
Your progress also.... I've been watching you work on the 2018 forum!
Thanks Jason.
I like your mirror mod. I may have to copy that. I have no trouble finding weathered closed-car rear-view mirrors, but the open car version seems to be scarce as hen's teeth.
Re: '26 Touring refurb...
Posted: Mon Jan 07, 2019 3:04 pm
by RustyFords
A couple other things I'm digging in your initial photos....
- The wagon...looks like a Falcon. How cool! I'd love to see more photos of it.
- You seem to keep your shop fairly organized. I keep mine the same, mainly out of self-defense. My (undiagnosed) ADD drives me crazy if I don't know where all my stuff is (tools, parts, etc)
Re: '26 Touring refurb...
Posted: Mon Jan 07, 2019 4:16 pm
by Barth_Tool_Co
rustyfords wrote: ↑Mon Jan 07, 2019 3:04 pm
A couple other things I'm digging in your initial photos....
- The wagon...looks like a Falcon. How cool! I'd love to see more photos of it.
- You seem to keep your shop fairly organized. I keep mine the same, mainly out of self-defense. My (undiagnosed) ADD drives me crazy if I don't know where all my stuff is (tools, parts, etc)
It's a '64 wagon. The last of the falcons I own. The guy I bought it from was going to do a V8 conversion but he never changed the front end over to the heavier V8 stuff so I sold his engine and tracked down a '68 inline 200 with a C4 behind it to swap in. We plan to use it for vacations hauling a little 1960 popup camper we have. I got the engine compartment restored, and am rebuilding the C4 with V8 clutch packs now so towing will never be an issue. Should be alot better than the 2 speed trans that came from the factory.
I do try and keep the shop clean, although it has it's moments! It was originally the 1930's milking building here when the farm was operational. The previous owner did some work to it but i'm going through it to suit my needs, getting there!
Re: '26 Touring refurb...
Posted: Mon Jan 07, 2019 4:23 pm
by Barth_Tool_Co
Working on removing the engine to go through it so I've got the floor boards and front end off for access. Somebody hacked up the dash switch assembly so I pulled that as well, maybe I'll fab up something custom that looks period...
Re: '26 Touring refurb...
Posted: Mon Jan 07, 2019 4:27 pm
by Barth_Tool_Co
I snagged this accessory taillight for the back. Since we can use YOM plates here in MI I have been on the lookout, finally found a decent pair... '26 plates are hard to find.
Re: '26 Touring refurb...
Posted: Mon Jan 07, 2019 6:12 pm
by fliverfan
That is so cool. Great minds must think alike. I called about that car a couple months ago but it was sold. Must have took two days just to wash it, looks great now! The listing and YouTube vid are still up if you want to get the "real" before pictures. Congrats and Good Luck with it!
Re: '26 Touring refurb...
Posted: Mon Jan 07, 2019 6:37 pm
by RustyFords
That “SLO” piece is beautiful.
Re: '26 Touring refurb...
Posted: Fri Jan 11, 2019 9:33 pm
by Barth_Tool_Co
Picked up this plate for mounting on the rear tire carrier...
Re: '26 Touring refurb...
Posted: Sun Jan 27, 2019 5:28 pm
by Barth_Tool_Co
The local Model A guys have a one day swap meet at a local dealership this time of year... Found some good deals for my '26. I saw a brass era radiator as well as a few other T parts. Engine comes out this week for teardown. I've got some of my steering and ruckstell parts at a machinists now and will be working on those things when they get back in a few weeks...
Re: '26 Touring refurb...
Posted: Sun Jan 27, 2019 6:34 pm
by Kts
You got me humming. Beachwood, etc!
Re: '26 Touring refurb...
Posted: Sun Jan 27, 2019 6:55 pm
by J1MGOLDEN
Jason, I just bought a 1926 Sport Touring too.
The previous owner bought it in 1947 while still in college, but he took good care of it.
I would post a photo, but these direction to post a photo are apparently written in Chinese.
I'm sure they will limit the SPAM anyway.
Re: '26 Touring refurb...
Posted: Mon Jan 28, 2019 11:37 am
by fliverfan
Just below the Save, Preview and Submit buttons is a small tab labeled Attachments. Click on the Add Files button in there to select and post a picture (or whatever type file the Board software allows/supports).
1926-27 Wood wheel 490 speedometer parts
Source:
http://www.mtfca.com/discus/messages/11 ... 1292196239
Re: '26 Touring refurb...
Posted: Mon Jan 28, 2019 12:46 pm
by Steve Jelf
Jim, posting a picture here is easier than on the old forum. You don't have to resize. Here's how:
Below the composition box, click Attachments.
Click Add Files.
Find the file that you want to post from your computer, click on it, and click Open.
Click Place inline and the name of the file will appear in the box.
Click Preview and your picture will appear in the box.
Re: '26 Touring refurb...
Posted: Mon Jan 28, 2019 3:30 pm
by Bill Dizer
On the Falcon, the factory tranny was a C-3, and the C-4 doesn't fit without a few clearance modifications. Great looking cars! I helped a friend stuff a 96 Mustang 5.0 HO and 5 speed in a 64 falcon. Used all the factory computer wiring, high flow motorcraft converters and even a dealer add on A/C under dash unit. Didn't have to change anything on the engine. Put a mustang two type front suspension on it, did away with shock towers and the braces. Ran great! Drove great!
Re: '26 Touring refurb...
Posted: Mon Jan 28, 2019 5:48 pm
by Barth_Tool_Co
Funny you should mention the C4 issues... I just put it in Saturday and had no issues, no mods needed. Must be the early C4's with the small bell housing are just the right size. I did have to use a different bolt in crossmember... Stock one won't work. Now I've got space to pull the T engine out!
Re: '26 Touring refurb...
Posted: Sun Feb 03, 2019 9:08 pm
by Barth_Tool_Co
The weather finally got into the 30's, up from below zero so I got a chance to pull the engine and tear it down into major components this afternoon... The whole thing needs a rebuild so that's where it's headed...
Re: '26 Touring refurb...
Posted: Mon Feb 04, 2019 6:49 am
by RustyFords
You're making some real progress...keep at it.
Re: '26 Touring refurb...
Posted: Mon Feb 04, 2019 8:01 am
by Ed Baudoux
Jason, small world. I recognize your place. I plumbed the farmhouse years ago. Mark and I have done a lot of work on our projects in that little shop. My in-laws live 3 doors west of you. Here's our Fordor. -Ed
Re: '26 Touring refurb...
Posted: Mon Feb 04, 2019 10:52 am
by Barth_Tool_Co
Ed... 3 doors west, must be talking about Dave and his wife?
It is a small world! The shop was one of the main reasons I bought the place, I had outgrown my little 1 car garage in Bay City and a 2 car garage with shop was like moving into a hanger. Mark has shown me pictures of the shop "back in the day" and told me about some of the projects that went on in there. I'm currently restoring it as time permits...
Re: '26 Touring refurb...
Posted: Sun Feb 17, 2019 1:48 pm
by Barth_Tool_Co
I got the steering shaft mount and ruckstell shifter back from the machinist today and they are great, nice and tight, gone is the major slop.
Re: '26 Touring refurb...
Posted: Sun Feb 17, 2019 1:52 pm
by Barth_Tool_Co
I also got the engine stripped down to the block and wire brushed the top, plus all the spot prone to cracking and couldn't find any looking at it from inches away. The block had all two piece valves... They won't be going back in.
Re: '26 Touring refurb...
Posted: Sun Feb 17, 2019 6:36 pm
by Barth_Tool_Co
I got the NOS quadrant installed today. Earlier I had welded up the bottoms of the levers and reshaped them as they were severely worn. What a difference, positive clicks and no slop in the head of the steering column. Steering should be much improved.
Re: '26 Touring refurb...
Posted: Sun Feb 17, 2019 8:46 pm
by RustyFords
Looking good....keep at it.
Re: '26 Touring refurb...
Posted: Tue Feb 19, 2019 9:13 pm
by Barth_Tool_Co
Uh oh.... we got a crack. Not unexpected but not welcome either.
I'm inquiring about metal stitching in MA and may have a lead on a machined block another hobbyist did not complete... working the options!
Re: '26 Touring refurb...
Posted: Wed Feb 20, 2019 9:30 am
by Original Smith
The reason your rear view mirror doesn't look right, is because it isn't right! The one you show is for a closed car. The factory brackets for the tourings and roadsters wrap over the top of the windshield frame, and were originally held on with two horn button bracket screws.
Re: '26 Touring refurb...
Posted: Thu Feb 21, 2019 8:34 am
by Barth_Tool_Co
Original Smith wrote: ↑Wed Feb 20, 2019 9:30 am
The reason your rear view mirror doesn't look right, is because it isn't right! The one you show is for a closed car. The factory brackets for the tourings and roadsters wrap over the top of the windshield frame, and were originally held on with two horn button bracket screws.
I figured that, good to hear confirmation. I like the accessory one I put on much better anyway... has kind of a purple tint to it

Re: '26 Touring refurb...
Posted: Thu Feb 21, 2019 9:28 am
by John Warren
Jason, There are two type of stitching that I am aware of. One being the bow tie type and the drill and tap type. If you elect to use the drill and tap type, I would just drill and tap both ends of the crack, basically drill stopping the crack. It is not into water and all model t's leak oil. You could grind the crack out some between the drill stops and use JB weld to seal. Most improved blocks crack through the valve seats into the water jackets. Your transmission drums look good, hope the rivets are tight. What you are doing looks great. Thanks for taking us along.
Re: '26 Touring refurb...
Posted: Thu Feb 21, 2019 11:55 am
by Altair
I thought a 26 had a nickel rad and head light rims, was there an early version?
Re: '26 Touring refurb...
Posted: Thu Feb 21, 2019 1:28 pm
by Barth_Tool_Co
Not a clue... I do know that this car has been in the hands of a not so talented restorer so I wouldn't use it as a reference for anything, lol.
Re: '26 Touring refurb...
Posted: Thu Feb 21, 2019 2:00 pm
by fliverfan
altair wrote: ↑Thu Feb 21, 2019 11:55 am
I thought a 26 had a nickel rad and head light rims, was there an early version?
They were advertised as being standard on closed cars with the nickel h/l rims standard on all models but in practice it seems some did and some didn't.
Re: '26 Touring refurb...
Posted: Sat Feb 23, 2019 10:46 pm
by Barth_Tool_Co
Good news and bad news today... The good news is the Joe Bell is going to rebuild a short block for me as he happened to have a good block in his possession, my block will be religated reserve status. The bad news is my transmission seems to have had a disaster in it's life and some shoddy repair work to make it "function". The clutch parts are bent, brake drum has a broken part off the drum casting insides, and the clutch disc are all burnt/discolored. The triple gears also have crazy play in them too... Gonna need some work!
Re: '26 Touring refurb...
Posted: Sat Feb 23, 2019 11:22 pm
by EricMac
The early 26 Ts had painted radiator shells (always black) but by calendar year 26 you could (in theory) get a nickel shell. Except for show cars, it tends to now be a matter of preference. Hope that helps.
Re: '26 Touring refurb...
Posted: Sun Feb 24, 2019 5:17 pm
by Barth_Tool_Co
Not a very good afternoon on the T... Lots of problems in the transmission that need attention, it's a fixable though and this is a great time of year up north to work on stuff!
I like to end the week on a high note so I put together this radiator cap, I will eventually plate the brass but that's down the road.
Re: '26 Touring refurb...
Posted: Sat Apr 06, 2019 8:16 pm
by Barth_Tool_Co
Big day today... paid a visit to Joe B to pick up a rebuilt short block and check out my transmission issues. I can't speak highly enough of Joe, first class fella. He was able to get me a good brake drum and output shaft as well as put new bushings in and allowed me to ream them on his KW tool.
He checked my pan and it was nice and straight, He may have found the one part on this T that isn't shot! I also ended up with some other needed parts and a rewound coil ring... Kid in a candy store!
Definitely worth the trip just to meet Joe, solving several major issues on the T was like a bonus.
Re: '26 Touring refurb...
Posted: Mon Apr 08, 2019 7:17 am
by RustyFords
Oooooooohhhhhhh......that is some serious eye candy right there.
I'm jealous.
Re: '26 Touring refurb...
Posted: Tue Apr 09, 2019 8:31 am
by Barth_Tool_Co
RustyFords wrote: ↑Mon Apr 08, 2019 7:17 am
Oooooooohhhhhhh......that is some serious eye candy right there.
I'm jealous.
Its going to be great to get it all together, I wish I was as far along on mine as you are on yours... I'm hoping for a late summer fire up, like you I have a lot of other work going on so the T doesn't get me much right now. I need a 36hr day
Re: '26 Touring refurb...
Posted: Sun Apr 14, 2019 11:28 pm
by Barth_Tool_Co
Had some time today to work on the T so I tackled the starter switch. The one in the car was modified to make a new switch fit the old base. I picked up an original to replace it. After disassembly I discovered the tabs on the sheet metal shaft were missing or bent so I bumped them back down and tack welded them for extra strength. Inside contacts were masked off, painted, and dabbed with some electric grease. The unit was then assembled and painted, ready for use.
Re: '26 Touring refurb...
Posted: Mon Apr 15, 2019 6:41 am
by RustyFords
Nice work.
It is satisfying when you can undo a cobbled together repair that didn't really work and replace it with a solid original part.
Re: '26 Touring refurb...
Posted: Mon Apr 15, 2019 11:56 am
by Barth_Tool_Co
RustyFords wrote: ↑Mon Apr 15, 2019 6:41 am
Nice work.
It is satisfying when you can undo a cobbled together repair that didn't really work and replace it with a solid original part.
Thanks! My favorite part of restoration is putting things right : Now I'm not sure if that's the correct switch for a '26 but I figured being able to take it apart with screws was safer than bending tabs.
Re: '26 Touring refurb...
Posted: Fri Apr 19, 2019 12:12 am
by Barth_Tool_Co
Whoever said "nothing good happens after midnight" is wrong... Just finished putting new gear pins in my flywheel and it couldn't have gone better!
They had some wear on them and we're pretty out of round so after consideration I decided to replace them and leave the bushings in the triple gears alone.
Toughest part was putting together a support for the flywheel around the pin when driving them out. A light coat of grease and the new ones drove home well.
The gears have a much better fit on the new pins than the old.
Re: '26 Touring refurb...
Posted: Fri Apr 19, 2019 8:09 am
by RustyFords
Nice. You're going to have a tight little engine when it's all said and done. Sweating the details makes all the difference.
Re: '26 Touring refurb...
Posted: Sun Jun 16, 2019 5:44 pm
by Barth_Tool_Co
Slow going but I am working on the front springs... House remodel and the falcon getting in the way, looking forward to getting lots done on the 4th holiday in a few weeks! I did get the front end pulled apart for a total rebuild, it needs it!
Re: '26 Touring refurb...
Posted: Sat Feb 22, 2020 8:08 pm
by Barth_Tool_Co
I had some time today and cleaned and painted the spindles as well as pressed in the new bushings. I'll take them to the machine shop soon for reaming to the spindles along with the head for a shave and the flywheel when its complete for balancing.
I spent the afternoon cleaning the old magnets for to send back and laying out the new charged ones. I ran into an issue with some of the original magnet hardware being damaged or pitted badly so I need to find some original replacements. I also ran into an issue with the starter ring gear, a few of the threaded holes had a bur or something and caused the brass screws to go in harder then I like so i'll have to pick up a #14-24 tap to clean them up.
Sunny and 40 in Michigan... feels like spring after the last week of near zero temp at night.
Re: '26 Touring refurb...
Posted: Sat Feb 22, 2020 9:06 pm
by Norman Kling
You started with more than I did! You have a beautiful car and it will also run very well too after you get it done. I hope you will have a good time driving it in the future. Here is a picture of mine the day I bought it and 10 years later when it was finished. you are doing a good job. Interestingly, you are fixing a lot of things which could have been replaced with aftermarket parts being sold by the vendors.
Norm
- 26 touring as purchased.jpg (61.04 KiB) Viewed 34433 times
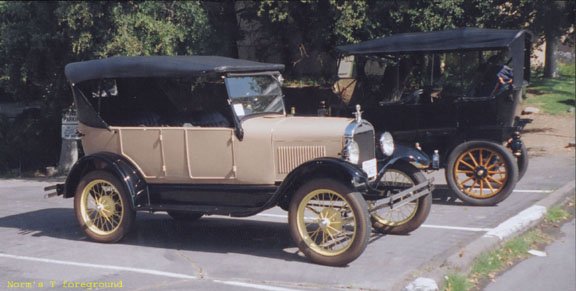
- Finished.jpg (52.14 KiB) Viewed 34433 times
Re: '26 Touring refurb...
Posted: Sat Feb 22, 2020 11:05 pm
by Barth_Tool_Co
Norman Kling wrote: ↑Sat Feb 22, 2020 9:06 pm
Interestingly, you are fixing a lot of things which could have been replaced with aftermarket parts being sold by the vendors.
Norm26
Great looking touring! Lots of work to turn a pile of parts into a car, I admire your dedication!
Thank you for the kind words!
Over the years restoring different cars I sometimes find restoration parts can be not so good or have the wrong finish. I prefer to rebuild original parts when I can, just my personal preference.
Re: '26 Touring refurb...
Posted: Fri Jun 04, 2021 10:42 pm
by Barth_Tool_Co
Swapped out the old Fisk tires on the rear rims for some new rubber and moved them to the front wheels. The front rims are pretty bad so I'll need to replace them eventually...
The old Fisk tires are pretty neat, they have this cool logo...
Amazingly, the insides of the Fisk tires look new and the tubes were in good shape, I doubt they would have lasted any length of time though.
Re: '26 Touring refurb...
Posted: Fri Jun 04, 2021 10:44 pm
by Barth_Tool_Co
Work on the steering column has continued at a slow pace, I finally finished filling in the pitting and got it in the paint booth tonight...
Re: '26 Touring refurb...
Posted: Fri Jun 04, 2021 10:53 pm
by Barth_Tool_Co
I was able to get my axle kingpins fixed by a local T guy recently also. The front axle was also bent so he straightened it and it's back in business.
I stripped the front of the frame today in preparation for cleaning and painting. Front cross member has a crack where the spring clamp/motor mount sits so that will have to be welded. I did decide against using the original spring I sand blasted. It was pretty crusty so I got a new one from Lang's, looks good. If all goes well the T will be back on all 4 wheels Sunday night.
Re: '26 Touring refurb...
Posted: Sat Jun 05, 2021 8:50 am
by varmint
I likes what I see.
Our T has a slime green engine also and we went back to the slime green using green rebar corrosion prevention paint. Paint yours any color you like.
Re: '26 Touring refurb...
Posted: Sat Jun 05, 2021 9:19 am
by TXGOAT2
Re: Fisk Air Flight Principle tires: The airplane in the logo looks a lot like the one flown by Charles Lindbergh in his historic 1927 transatlantic flight . From the New York Times, 1929: COMPANY PRODUCES NEW AUTO TIRE; Head of Fisk Company Describes It as "Air-Flight Principle."
Re: '26 Touring refurb...
Posted: Sat Jun 05, 2021 9:41 am
by Barth_Tool_Co
TXGOAT2 wrote: ↑Sat Jun 05, 2021 9:19 am
Re: Fisk Air Flight Principle tires: The airplane in the logo looks a lot like the one flown by Charles Lindbergh in his historic 1927 transatlantic flight . From the New York Times, 1929: COMPANY PRODUCES NEW AUTO TIRE; Head of Fisk Company Describes It as "Air-Flight Principle."
It does at that, I'm going to keep them and use them as a display outside my garage...
Re: '26 Touring refurb...
Posted: Sat Jun 05, 2021 9:44 am
by Barth_Tool_Co
varmint wrote: ↑Sat Jun 05, 2021 8:50 am
I likes what I see.
Our T has a slime green engine also and we went back to the slime green using green rebar corrosion prevention paint. Paint yours any color you like.
Must have been a popular color! I've seen some vintage house basements that are the same color... I'll most likely go with something closer to the FORD T green.
Re: '26 Touring refurb...
Posted: Sat Jun 05, 2021 11:14 pm
by Barth_Tool_Co
Busy day today... Repaired the cracked front cross member. Initially I just welded the cracks but this didn't work very well so I cut the bad part out and welded a new section in.
I removed the old paint from the front axle and repainted it along with a bunch of front end parts...
Also cleaned and painted the front of the frame...
Re: '26 Touring refurb...
Posted: Sun Jun 06, 2021 6:51 pm
by Barth_Tool_Co
It's on 4 wheels again!
Now I need to clean the garage!
Re: '26 Touring refurb...
Posted: Sun Jun 06, 2021 6:54 pm
by Barth_Tool_Co
Corrina hasn't been dusted or seen the sun since she was pushed into the garage a few years ago. Looking much better after a wipe down.
Re: '26 Touring refurb...
Posted: Sun Jun 06, 2021 8:17 pm
by Mopar_man
Looks like you are making great progress. I don't know how I missed this thread. I'm redoing a 26 touring myself. Looks like you are coming along!
Re: '26 Touring refurb...
Posted: Sun Jun 06, 2021 9:13 pm
by Norman Kling
You are doing a very good job. It should be printed in booklet form, or put on the web for reference to those future brave souls who take on a project this big.
Norm
Re: '26 Touring refurb...
Posted: Sun Jun 06, 2021 10:26 pm
by Barth_Tool_Co
Mopar_man wrote: ↑Sun Jun 06, 2021 8:17 pm
Looks like you are making great progress. I don't know how I missed this thread.
I saw your thread, looks like it's going well! You probably missed mine because I haven't posted on it since last year... I'll be honest, there is another vehicle in my life that I've been seeing. She's pretty needy too!
Re: '26 Touring refurb...
Posted: Sun Jun 06, 2021 11:07 pm
by Barth_Tool_Co
Norman Kling wrote: ↑Sun Jun 06, 2021 9:13 pm
You are doing a very good job. It should be printed in booklet form, or put on the web for reference to those future brave souls who take on a project this big.
Norm
Thank you for the kind comment! I look forward to driving her, it was nice to sit in the seat with a steering wheel in my hand OUTSIDE the garage today though! One step at a time...
Re: '26 Touring refurb...
Posted: Mon Jun 07, 2021 12:17 pm
by Mopar_man
Now that's a cool truck!!
Re: '26 Touring refurb...
Posted: Sat Aug 28, 2021 6:01 pm
by Barth_Tool_Co
Got some more time to monkey with the T this AM so I went at it with gusto...
I got the hood shelves cleaned up (amazing how much dried grease and dirt is coagulated on the underside of the tins). I ordered a few things that showed up this week, including some new wood for the hood shelves to replace the rotten originals.
I sanded off the markings on the bolt heads, gave them a quick sand blast for some teeth and painted them in krylon lacquer.
The fenders and shelves went back on today once the bolts were dry...
Re: '26 Touring refurb...
Posted: Sat Aug 28, 2021 6:13 pm
by Barth_Tool_Co
All through the refurb I've been snagging good NOS repro parts, I've found quite a few goodies that I need. I installed the terminal block without any fuss.
I also got the lacing on the radiator shell in.
I popped the shell on the frame to take a look, been a while since Corina has had a snout... you take things apart and forget how cool they look!
I pulled the fuel tank in preparation for cleaning and sealing. It was a fight to get it out but I won. I didn't have to pull the dash or steering column so that was nice! The tank looks to be in very good condition, I'm sealing another tank early this week and figured I might as well do this one at the same time.
Lots of projects going on right now so the garage is a disaster, I'm going to be hitting things hard in the coming weeks to get the madness under control and clear up some space!
Re: '26 Touring refurb...
Posted: Sun Aug 29, 2021 1:30 am
by Scott C.
I like your 404! Is it a Swiss model? It's hard to tell without the top.
Re: '26 Touring refurb...
Posted: Sun Aug 29, 2021 8:08 am
by Barth_Tool_Co
Scott C. wrote: ↑Sun Aug 29, 2021 1:30 am
I like your 404! Is it a Swiss model? It's hard to tell without the top.
Yup, Swiss army. I picked it up during the height of the pandemic and have been sorting it since. Lots of issues just like my T, I'm a sucker for the hard luck cases I guess!
Re: '26 Touring refurb...
Posted: Sun Sep 05, 2021 11:46 pm
by Barth_Tool_Co
I sneaked the head into my blasting cabinet a few days ago when doing some other blasting...
Followed by a cleaning and some high temp primer...
Followed by lightly oiling the combustion chambers to keep rust at bay until I get the rest of it together, then I installed the head gasket. This is where things got a bit confusing... The instructions said to put the side that said "This Side Up" facing up and that the gasket GN logo would be on the backside facing the block. The only problem is they are both on the same side...
After some test fitting I was reassured by the front and rear water passage sizes that despite the logo on the same side as the "This Side Up" mark that side did indeed go up. I double checked the length of the new head bolts and installed them loosely by hand.
I torqued to 45ftlb in stages and then a few more times after the gasket compressed until it stayed at 45ftlb.
Re: '26 Touring refurb...
Posted: Sun Sep 05, 2021 11:47 pm
by Barth_Tool_Co
I installed some "Radioactive" spark plugs to keep the mice out of the cylinders and poison/mutate them slowly while they make a hasty retreat from the power of the atom. The block will be scuffed and painted green when the rest of the engine is assembled and ready to install.
Re: '26 Touring refurb...
Posted: Wed Sep 08, 2021 10:24 pm
by Barth_Tool_Co
I got the fuel tank sealed tonight with POR15 tank sealer, interesting process as I've used the stuff before. I cleaned out the tank and gave it a Muriatic acid wash followed by a bunch of rinsing.
After the initial clean and rinse I went to the POR-15 metal prep step where the tank is kept wet with the prep solution for 20 minutes then drained, rinsed and dried. The POR stuff needs the tank insides to be bone dry so I set up my heat gun on low and got it ready to go.
Application was easy, I plugged the filler and outlet after emptying the POR15 into the tank and commenced rolling the tank 'round for 10 minutes.
After letting the tank drain for the required time I set the tank at an angle and used q-tips to clean the threads on the filler and outlet just in case, I didn't want any of this stuff gumming up the threads when cured.
Now we wait for it to cure in 4 days... I used about 1/3 of a pint to do the tank, most of it came back out, I was surprised at how much I didn't use. I'm waiting on an order from Lang's for the parts to reinstall the tank but they should be here early next week.
Re: '26 Touring refurb...
Posted: Fri Sep 10, 2021 10:27 pm
by Mopar_man
All of your posts look familiar. Ha!! I've been doing the same thing. You are way ahead of me. You have an interior. I'm about to start mine soon and then start on the interior.
Re: '26 Touring refurb...
Posted: Mon Oct 25, 2021 9:16 pm
by Barth_Tool_Co
Mopar_man wrote: ↑Fri Sep 10, 2021 10:27 pm
All of your posts look failure. Ha!! I've been doing the same thing. You are way ahead of me. You have an interior. I'm about to start mine soon and then start on the interior.
I've been watching your thread, the T is looking good!
Re: '26 Touring refurb...
Posted: Mon Oct 25, 2021 9:23 pm
by Barth_Tool_Co
I spent Sunday moving things around in the garage prepping for winter, got the T engine into the heated part and ready for more work. While I had the T pushed out of the garage I climbed into the engine bay and pulled out the last of the worn out wiring harness. They really did a number on the starter button mounting plate, good thing it's getting replaced! This wiring is done for.
Re: '26 Touring refurb...
Posted: Tue Oct 26, 2021 10:35 am
by Mopar_man
Looking at my post I think my computer changed Familiar to failure. Sorry about that. I need to proofread. Love following the builds.
Re: '26 Touring refurb...
Posted: Sun May 15, 2022 9:31 pm
by Barth_Tool_Co
Got myself a new rim to replace the horribly bent one currently on the rear driver's side... I blasted and painted this one so at some point I'll have to pull the tires off the front rims and blast/paint those so they match! Installing the tire was no problem with the rim spreader handy.
Re: '26 Touring refurb...
Posted: Sun May 15, 2022 9:37 pm
by Barth_Tool_Co
I built up a magnet height tool to help me get all the heights right. I started with a piece of steel tubing and parted off a bit to act as a stop.
I then drilled 3 holes in it to weld it to the shaft.
I made the arm out of some scrap steel I had lying around and welded it up.
Once fabrication was done I was able to test it out. The micrometer easily installs with a set screw.
Re: '26 Touring refurb...
Posted: Mon May 16, 2022 1:36 pm
by Mopar_man
That's a cool tool you built. I think I lifted the flywheel on and off the engine 50 times before I got the shims right. But when you get them right you get lot's of power.